quinta-feira, 17 de agosto de 2017

Customizar Site Sharepoint no Modern Temas / Customizing "modern" team sites

During the autumn of 2016 the SharePoint Online team released "modern" collaboration sites. These modern team sites are integrated with Office 365 groups and bring a greatly improved end user experience. "Modern" team sites are responsive by design and they are much faster to create and use from an end user perspective. Here are some of the key benefits in the "modern" team sites.
  • Designed to scale for any device natively without customizations - fully responsive experience
  • Native news, quick links, and activity capabilities
  • Office 365 group integration
  • Significantly faster to create compared to "classic" team sites
  • Modern lists and libraries with support for Microsoft Flow and PowerApps
  • Modern page editing capabilities
  • Updated site contents page with additional insights on site usage
This article concentrates on the available extensibility options within "modern" team sites. Here are key links around the key capabilities:
Important: We're not deprecating the "classic" experience, both "classic" and "modern" will coexist.
Applies to: SharePoint Online

Supported customizations in "modern" team sites

"Modern" sites have a different level of customization options compared to "classic" team sites. Over time we'll introduce additional customization options, mainly focusing on extensibility and branding. The list below gives a quick overview of the supported capabilities for "modern" team sites.
  • Apply a custom theme / change the logo
  • Apply an out of the box theme
  • Custom Site columns (fields) and content types
  • Lists and libraries
  • Site configurations, like regional settings, languages and auditing settings
Note: By default a "modern" team site has scripting capabilities turned off. You can still apply a custom theme, but you cannot introduce a custom theme to the theme gallery as an option for end users. If you want to add a theme to the theme gallery you need to enable scripting on the site.

What's not supported with "modern" team sites?

There are numerous areas in the "modern" team sites where the typical customizations are not at least currently available. There will be further support for some of these specific topics when they are ready to be released. Below is a list of currently unsupported customizations in "modern" team sites:
  • Custom master pages - More extensive branding will be supported later using alternative options
  • Changing "modern" site to use classic seattle.master or oslo.master
  • Custom page layouts - We are looking to have support for multiple canvases in the future
  • Enabling site or site collection scoped publishing features. Technically features can be currently activated, but this is not supported configuration.
  • User custom actions / Custom JavaScript - There will be a more controlled way to embed JavaScript on the pages through the SharePoint Framework Extensions (currently in dev preview)
  • "Modern" sub sites - Sub sites created in "modern" team sites use the "classic" experience, but you can change the user experience to be similar to "modern" sites
  • Control available sub site template options
  • "Classic" publishing features (WCM)
  • Activating community feature or creating community sub sites under modern" team site
Since "modern" team sites also have scripting capabilities disabled (it's a so called 'noscript' site), there are numerous additional areas which cannot be customized. The impact of 'noscript' is the same for "modern" or "classic" sites. "Modern" sites have 'noscript' by default enabled, meaning that scripting capabilities are not available. It is however possible and supported to disable 'noscript' setting in both "modern" and classic sites to further enable some capabilities.
Here are some key areas to take in account when you design your solutions related on the 'noscript' setting:
  • Sandbox solutions are not supported
  • Custom JavaScript cannot be enabled in the sites using "classic" extensibility options (e.g. via user custom actions)
  • You cannot access sites using SharePoint Designer
  • Some web parts are not available for end users
  • Accessing or updating site property bag entries
Note: You can find the full list of impacted capabilities from the Microsoft Support article under the "Features affected when scripting is disabled" chapter.

Using PnP Provisioning Engine with "modern" team sites

You can use the PnP Provisioning Engine with "modern" team sites. The PnP Provisioning Engine will automatically detect if a site is a "modern" team site and will adjust its behavior based on the supported capabilities. The process is exactly the same as using the PnP Provisioning Engine with "classic" sites where the scripting capabilities are not disabled.
The following elements are ignored when a remote template is applied to a "modern" team site or a site which has noscript enabled.
  • Site collection AuditLogTrimmingRetention configuration in the auditing settings
  • Apply a custom theme from the template - Current implementation has dependency on storing custom theme to catalog, which is not supported
  • Form settings for content types
  • Adding custom user actions to site, web, or list level
  • Adding files with file types of ".asmx", ".ascx", ".aspx", ".htc", ".jar", ".master", ".swf", ".xap", ".xsf"
  • Adding files to libraries with the following urls "_catalogs/theme", "style library", "_catalogs/lt", "_catalogs/wp"
  • Adding web parts to site pages
  • Storing provisioning template information to the property bag of the provisioned site
  • Adding or updating property bag entries to the site property bag
  • "Classic" publishing settings and assets
  • Site No Crawl settings
  • Site master page settings

Applying custom theme to "modern" team site

"Modern" team sites support custom themes even though you cannot upload a new gallery entry for end users. This can be achieved by uploading the needed assets to the site and then executing ApplyTheme method. The following PowerShell script shows how to perform this for a "modern" team site.

# Connect to a previously created Modern Site
$cred = Get-Credential
Connect-PnPOnline https://[tenant].sharepoint.com/sites/siteurl -Credentials $cred

# Apply a custom theme to a Modern Site

# First, upload the theme assets
Add-PnPFile -Path .\sppnp.spcolor -Folder SiteAssets
Add-PnPFile -Path .\sppnp-bg.png -Folder SiteAssets

# Second, apply the theme assets to the site
$web = Get-PnPWeb
$palette = $web.ServerRelativeUrl + "/SiteAssets/sppnp.spcolor"
$background = $web.ServerRelativeUrl + "/SiteAssets/sppnp-bg.png"

# We use OOTB CSOM operation for this
$web.ApplyTheme($palette, [NullString]::Value, $background, $true)
$web.Update()
# Set timeout as high as possible and execute
$web.Context.RequestTimeout = [System.Threading.Timeout]::Infinite
$web.Context.ExecuteQuery()

"Modern team site with custom theme"
Note:
  • You can use SharePoint Color Palette Tool to create a custom theme file (.spcolor) with the custom color definition. In general, modern team sites try to preserve the feel of the theme by automatically converting classic site theming elements to the modern side. Preserved areas are background image and the following theme slots: ContentAccent1, PageBackground, and BackgroundOverlay.
  • You can change the logo of "modern" team site by using the Groups Graph API as shown by the SharePoint PnP UpdateUnifiedGroup method
  • Applying a custom theme to a modern team site can cause timeouts. The resolution to this is to turn off all available user interface languages for the site before applying the theme. Then turn them back on afterwards.

How to determine if a site is a "modern" team site?

You can detect that a site is a "modern" team site by checking the 'Web.WebTemplate' value of the site. "Modern" team sites are using the "GROUP" template. Since the supported capabilities are the same for a "classic" team site when the scripting is disabled, you should be checking both settings in your code to determine the right behavior or supported capabilities.
Since there's no direct property to check if the scripting is enabled or not, you can use permissions to determine the current status. When scripting is enabled, there's no AddAndCustomizePages permission in the base permissions of the site.

Additional Considerations

We'll gradually introduce more customization options for "modern" team sites. These will be aligned with the release of additional SharePoint framework capabilities. Currently there is no exact schedule available, but we'll be updating the "modern" experience articles whenever new capabilities are released.

Additional resources

Como alterar logo Sharepoint Online - Novo Layout

If it is a Office 365 group site, actually, it is possible to change the logo. Please take a look at this 

Or we can change the URL to 
https://contoso.sharepoint.com/sites/sitename/_layouts/15/prjsetng.aspx
this will bring us to the Title, Description, and Logo page,change the logo there.

segunda-feira, 7 de agosto de 2017

O arquivo pode ter sido alterado por outro usuário desde que foi salvo pela última vez. Erro ao salvar arquivo no Excel

ISSUE:
When saving an Excel file multiple times, user receives message "The file may have been changed by another user since you last saved it. In that case, what do you want to do? Save a Copy | Overwrite the changes".
Repro Steps:
- Sync a OneDrive library with the local OneDrive client
- Open any Excel file in Excel 2016
- Make any change and save (file saves successfully)
- Make another change to the same file and save
Workaround:
- Right click OneDrive in system tray
- Select Settings
- Click the Office tab
- Uncheck “Use Office 2016 to sync files that I open”
Note: If you turn off the Use Office 2016 to sync files that I have open setting, any changes that you and other people make to Office files will no longer merge together automatically. You will also no longer be able to share a document directly from the Office apps.
*Microsoft's Product Team is currently working on a long term fix.

quarta-feira, 19 de julho de 2017

Como adicionar/configurar uma impressora no Windows 10

Passo 1. Clique no menu iniciar e selecione “Configurações”;
Acesse as configurações no menu iniciar do Windows 10 (Foto: Reprodução/Barbara Mannara)Acesse as configurações no menu iniciar do Windows 10 (Foto: Reprodução/Barbara Mannara)
Passo 2. Em seguida selecione o item “Dispositivos”;
Nas configurações acesse o item dispositivos (Foto: Reprodução/Barbara Mannara)Nas configurações acesse o item dispositivos (Foto: Reprodução/Barbara Mannara)
Passo 3. No menu lateral escolha a opção “Impressoras e Scanners” e clique em “Adicionar uma impressora ou scanner”;
Adicione a impressora wireless no Windows 10 (Foto: Reprodução/Barbara Mannara)Adicione a impressora wireless no Windows 10 (Foto: Reprodução/Barbara Mannara)
Passo 4. Será mostrada a sua impressora na listagem. Basta selecionar o item e concluir em “Adicionar Dispositivo”;
Aguarde o sistema encontrar a impressora wireless e conclua a instalação (Foto: Reprodução/Barbara Mannara)Aguarde o sistema encontrar a impressora wireless e conclua a instalação (Foto: Reprodução/Barbara Mannara)
Passo 5. Ao finalizar a instalação automática note que há um ícone indicando que a impressora está pronta para uso.
Note que a impressora está pronta para uso (Foto: Reprodução/Barbara Mannara)Note que a impressora está pronta para uso (Foto: Reprodução/Barbara Mannara)

terça-feira, 18 de julho de 2017

Como desinstalar a chave do Windows 10 e usar a key em outro PC

Usuários que possuem o Windows 10 ativado podem não apenas acessar todos os recursos do software, mas contam, ainda, com opções extras de segurança – o sistema realiza, por exemplo, a verificação da conta e mantém funcionando apenas PCs que estão de acordo com os Termos de Licença da Microsoft.
Verificar se a chave do Windows 10 está ativada é fácil, bem sabemos. Mas e como desabilitar a ativação da mais recente versão do sistema operacional para que uma mesma chave possa ser usada em outro computador? Neste tutorial, portanto, você vai aprender a desinstalar a Product Key do seu Windows 10 através do Prompt de Comandos e por meio das permissões de Administrador.
Vale frisar que a remoção da chave do sistema pode se mostrar útil a usuários que desejam ativar o Windows 10 em outra máquina equipada também com o SO da Microsoft. Para que o processo possa ser concluído, é recomandado que a mesma conta de usuário seja usada durante a ativação do novo PC.
Veja como é fácil desinstalar a chave do produto no Windows 10.

Atenção!

Não recomendamos a desinstalação da Product Key por usuários pouco experientes e que não pretendem reutilizar a chave em outro computador com Windows 10.

Abra o Prompt de Comando como Administrador

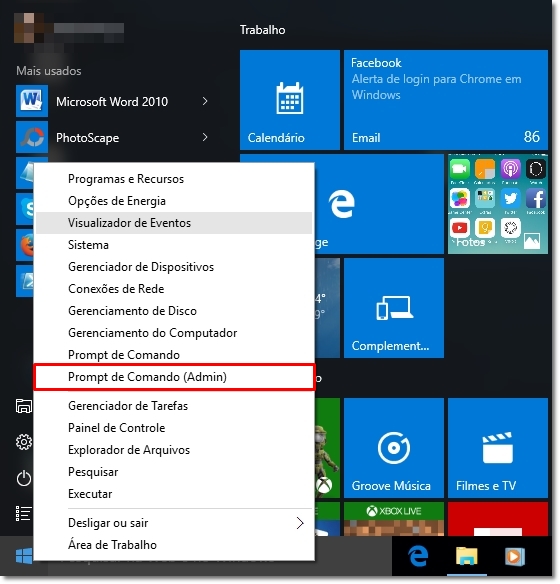
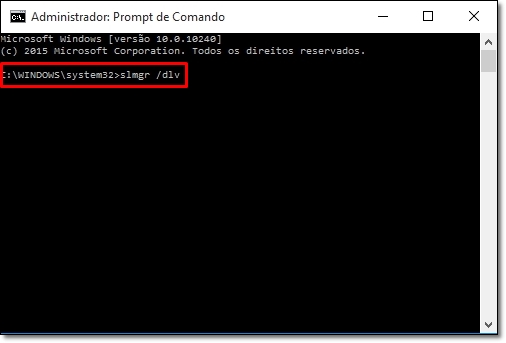
 Clique com o botão direito do mouse sobre o ícone do Windows, à esquerda da Barra de Tarefas, e abra a opção “Prompt de Comando (Admin)”. Em seguida, digite o comando “slmgr /dlv”, sem aspas, e aperte “Enter”.

Anote a Identificação da Ativação

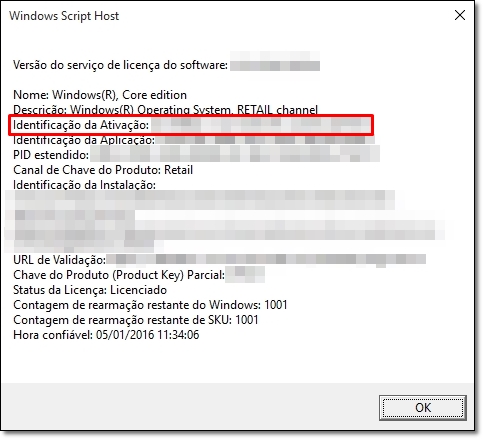
Ao executar o comando “slmgr /dlv”, uma janela do Windows Script Host deverá aparecer. Anote, então, o número exibido pelo campo “Identificação da Ativação”.

Desinstale a chave do produto

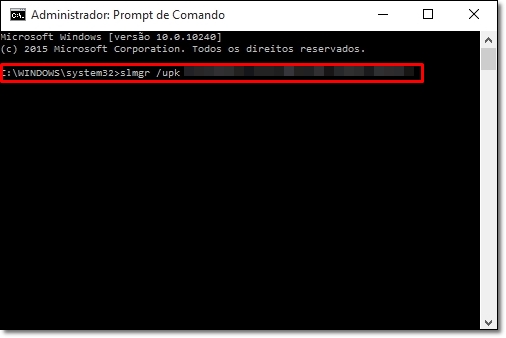
Novamente junto do Prompt de Comando, informe o comando “slmgr /upk”, sem aspas, aperte a barra de espaços e entre com o código exibido pela opção “Identificação da Ativação”. Aperte “Enter” e pronto. Uma mensagem sobre a desativação da chave do produto deverá aparecer logo em seguida.
Informe, ao lado do comando, o código referente à opção "Identificação da Ativação".
Nota: não executamos o último comando, pois, em nosso caso, não há interesse em remover a chave de ativação do Windows 10.

sexta-feira, 14 de julho de 2017

Desabilitar codigo PIN Windows 10 - Windows Hello

1. Remove existing PIN
Delete the following folder: C:\Windows\ServiceProfiles\LocalService\AppData\Local\Microsoft\NGC\
2. Disable Windows Hello (disables PIN, Face, whatever sigin prompt and setup)

[HKEY_LOCAL_MACHINE\SOFTWARE\Policies\Microsoft\PassportForWork]
"Enabled"=dword:00000000

quinta-feira, 13 de julho de 2017

Convert a user mailbox to a shared mailbox

IMPORTANT: The user mailbox you're converting needs an Office 365 license assigned to it before you convert it to a shared mailbox. Otherwise, you won't see the option to convert the mailbox. After converting the mailbox to a shared one, you can remove the license from the user's account.
If you've already deleted the user account, see Convert the mailbox of a deleted user.
  1. Sign in with your Office 365 admin account at https://portal.office.com/adminportal/home.
  2. On the Active users page, select the user whose mailbox you want to convert.
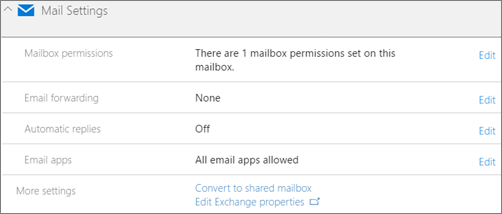
  3. On the user's page, expand Mail Settings and click Convert to shared mailbox. You won't see this option if the user doesn't have an Office 365 license assigned to them.
    Screenshot: Convert user mailbox to shared mailbox
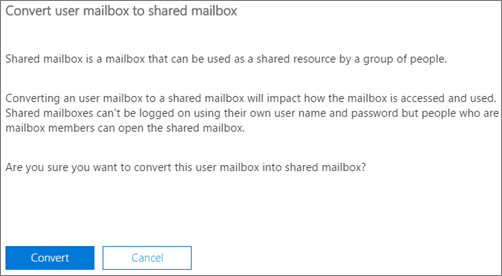
  4. Click Convert to complete the conversion.
    Screenshot: Click or tap Convert to convert user mailbox to shared mailbox
  5. After the conversion is complete, you can remove the license from the user, and stop paying for it.
  6. For everything else you need to know about shared mailboxes, please see Create a shared mailbox.

Convert the mailbox of a deleted user

Let's say you've deleted a user account and now you want to convert their old mailbox to a share mailbox. Here's what you need to do:
  1. Make sure an Office 365 license is assigned to it.
  2. Wait 20-30 minutes for their mailbox to be recreated.
  3. Now follow the instructions on this page to convert their mailbox to a shared mailbox.
  4. After that's done, you can delete the user's account and stop paying for their Office 365 license.
  5. Add members to the shared mailbox.

Convert a user's mailbox in a hybrid environment

If this shared mailbox is in a hybrid environment, it's recommended that you move the user mailbox back to on-premises, convert the user mailbox to a shared mailbox, and then move the shared mailbox back to the cloud.

Convert a user mailbox to a room or equipment mailbox

You can also convert a mailbox from one mailbox type to another, but you'll have to perform these tasks using Exchange PowerShell. Check out Convert a Mailbox for more details.

segunda-feira, 26 de junho de 2017

Adicionar ou Remover Conta de Email Exchange no Android e Iphone

NO ANDROID


Para remover a conta antiga:

Ir em  Configurações > Contas > (seu email antigo)  > Clique na conta e Remover conta
Saiba mais...

Para adicionar uma nova conta:

  • Baixe o APP em Microsoft Outlook

  • Em seguida, abra o Outlook no seu Android > Adicionar conta > digite o email da conta, depois CONTINUAR, digite sua senha do e-mail

  • Escolha o tipo da conta (Office 365)

NO IPHONE

Como remover a conta antiga (Clique Aqui)

Para adicionar a nova conta:

Ir em Ajustes > E-mail > Contas > Adicionar Conta > Escolha o tipo da conta (Office 365 ou Exchange)

Coloque seu email e senha (mesma utilizada no computador).

Se aparecer alguma tela de confirmação, pressione OK.

terça-feira, 20 de junho de 2017

Como configurar o auto complete (preenchimento automatico dos contatos) no Outlook em uma nova conta

  1. Create a new message.
  2. Press the To… button.
  3. Select the contact list in the right top corner from which you would like to add the contacts from.
    • Examples; Contacts folder, Global Address List (GAL) or a contacts folder in a Public folder.
  4. Select the first contact.
  5. Scroll all the way down to your last contact.
  6. Hold the SHIFT button on your keyboard while clicking on the last contact to select them all.
  7. Press the To –> button to add them all to the To… field.
  8. Repeat step 3 to 7 if you have contacts in additional lists that you would like to add.
  9. Press OK to close the dialog and to return to the newly created message.
  10. Now, depending on your Outlook version, do the following;
    • Outlook 2007 or previous
      Close the message and press No when prompted to save changes.
    • Outlook 2010, Outlook 2013 and Outlook 2016
      You must send the message to actually store these addresses in the AutoSuggest cache. However, by placing Outlook in Offline Mode first via the Send/Receive tab, you can easily prevent it from actually being sent by removing it from the Outbox and then place Outlook back online mode.
Now when you address a new message, the AutoSuggest/Auto-Complete feature will pop-up again.

Como mover senhas e favoritos entre Microsoft Edge Chromium

  Press  Win + R  keys to open up the  Run  dialog box. Type  %LocalAppData%\Microsoft\Edge\User Data  and press  enter . Move the  Default ...