Mostrando postagens com marcador Virtualização. Mostrar todas as postagens

terça-feira, 16 de maio de 2017

Aplicar Patch de atualizações no XenServer 6.2


Blog-Graphic-for-xenserver_732x409_v1

Acesse o servidor o qual será aplicada a correção, utilizando winscp para windows ou programas de transferência de arquivos por ssh no linux.
Faça upload dos arquivos de atualização para a pasta /root/updates, se não existir esta pasta favor criar.
Agora acesse a aba console do servidor de virtualização utilizando o XenCenter na mesma versão que o servidor.
Logar na console, é só teclar enter.
Execute o comando:
   # cd updates
Para verificar o nome dos arquivos
   # ls
Executar na console os seguintes comandos:
  # xe host-list
   uuid ( RO)                : b7aa8618-5f1b-4731-ae9f-f869cd6293cf
             name-label ( RW): Argos
   name-description ( RW): Default install of XenServer
Com este comando será listado o host-uuid do servidor, favor copiar esta informação.
Agora faça upload do patch de correção:
  # xe patch-upload file-name=XS62E00<X>.xsupdate
    The uploaded patch file already exists
    uuid: 59128f15-92cd-4dd9-8fbe-a0115d1b07a2
Onde <X> será a versão do patch de correção.
Copiar o número uuid da atualização.
Agora aplicar o patch de atualização do servidor.
   # xe patch-apply host-uuid=<numero_id> uuid=<id_da_atualizacao>
Verifique se os patch de correção foram aplicados.
   # xe patch-list
Agora executar o comando para restartar e aplicar as correções.
   # xe-toolstack-restart

segunda-feira, 12 de dezembro de 2016

Tudo sobre o Time Capsule

Whether you’re new to the Mac platform or have been using it for years, there’s one feature built into Mac OS X that you should not only know about, but use. That feature is Time Machine, a built-in backup application used to keep an up-to-date copy of all of the files on your Mac. Time Machine is unique among most backup applications in that it captures exactly what was on your Mac on any day in the past, making it easy to recover files, emails or media that may have been inadvertently deleted. While what Time Machine does is surprisingly complex, setting it up and using this feature is quite simple. We show you how to use Time Machine on your Mac:
Selecting a backup destination
To start setting up Time Machine, you need to have a backup destination — the device on which your files will be backed up. Time Machine can back up to many devices:
• An external hard drive or solid state drive connected to the Mac over USB, FireWire or Thunderbolt. OWC offers a huge variety of external drives, using FireWire, USB 2, USB 3, Thunderbolt and Thunderbolt 2 connections.
• An external hard drive or SSD connected to the USB port of an Apple AirPort Extreme 802.11ac or other Wi-Fi routers that specifically provide Time Machine compatibility over a Wi-Fi connection.
• An Apple AirPort Time Capsule or an OS X Server on the same network as your Mac.
How often does Time Machine back up your Mac, and for how long?
Time Machine performs a full backup of your Mac when it is first set up. This initial backup can take some time, so be patient and allow it to finish. Once the first backup is complete, Time Machine checks your Mac for new, changed, and deleted files once every hour. Time Machine keeps these hourly backups for the past 24 hours, then keeps a daily backup for the past month. It also keeps weekly backups for as long as the external drive that you’re using for Time Machine has available space. Once the backup drive is full, the oldest backups are deleted from Time Machine.
For this very reason, some Mac users prefer to use Time Machine for their regular backups, but make bootable full backups of their Macs frequently on another external drive using a backup utility like Carbon Copy Cloner or SuperDuper!.
Setting up Time Machine
With a properly-formatted and empty external drive, setting up Time Machine is simple — just connect it to your Mac. If this is the first time you’ve specified a backup device, Time Machine asks if you want to use that drive to back up the Mac with Time Machine:
Time Machine reacting to a new external drive
To use the drive as your backup disk, just click the “Use as Backup Disk” button and Time Machine begins the initial backup. That was easy, wasn’t it?
One thing you may want to do is encrypt your backup disk, so that it’s impossible for others to look at your backup files without knowing a password that you’ve set. This is also easy to set up; check the “Encrypt Backup Disk” box as seen in the image above, then provide a password when prompted.
The external disk you have purchased from OWC may or may not be formatted in the format that Time Machine needs. That format is called Mac OS X Extended (Journaled), which sounds daunting but really isn’t. If the drive isn’t in that format and is using the common Windows-based NTFS or FAT formats instead, Time Machine will prompt you to reformat the drive. Before you let it reformat the drive, realize that doing so completely erases all files on the external drive. If you’re thinking about re-using an older drive for Time Machine and wish to keep the files stored on it, then don’t reformat; get another drive that is blank.
Using Time Machine with an Apple AirPort Time Capsule
Apple’s AirPort Time Capsule is an interesting hybrid device, part backup external drive and part Wi-Fi router. The wireless capabilities are really useful with the MacBook line, as the laptops don’t need to be physically connected to a drive to stay backed up. The process of setting up Time Machine to work with an AirPort Time Capsule or other Network Attached Storage is different.
The AirPort Time Capsule needs to be set up properly and working prior to using it for Time Machine backups. Either a Mac or iOS device can be used to set up and configure the AirPort Time Capsule; full instructions for the setup process are included with the device, or can be downloaded here.
Once that’s done, click on System Preferences in the Dock on your Mac, then select Time Machine. The preference pane looks like this:
Time Machine preferences
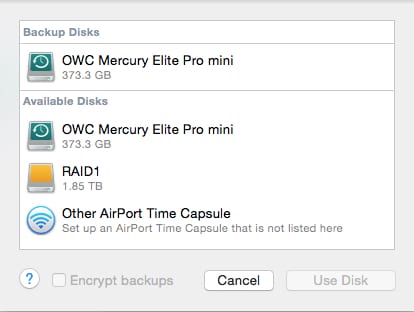
Click the “Select Backup Disk” button, and something similar to the screen seen below appears:
Selecting Backup Disk in TIme Machine

The AirPort Time Capsule should appear as one of the Available Disks. If it doesn’t appear, click Other AirPort Time Capsule to select yours. Once you’ve selected the AirPort Time Capsule by highlighting it in the list with a click, click the “Use Disk” button. As before, you can select to encrypt your backup. There’s also a check box to “Show Time Machine in menu bar”. Some people may not want or care to know if Time Machine is in the middle of a backup, so if that’s the situation with you, just uncheck that box. If the Time Machine button Off/On button (see the image of the preference pane above) is in the Off position, click on it to turn Time Machine on. The backup begins.
The Initial Backup
Now comes the fun part; Time Machine backs up each and every file on your Mac. Fortunately, you can continue working on your Mac while it’s doing the backup. Be sure to leave your Mac on so that Time Machine is able to capture all of the information. Once the first backup is complete, you’ll see a notification similar to the one shown here:
Backup Complete
When using an AirPort Time Capsule, it’s sometimes much faster running the initial backup if you run an Ethernet cable between an Ethernet port on your Mac and an open Ethernet port on the AirPort Time Capsule.
Everyday Backups
After the initial backup is done, Time Machine automatically begins to back up any files that have changed on the Mac since the last backup, and it does this every hour on the hour as long as there’s a connection between the Mac and the backup destination. Even a MacBook set up with Power Nap (a function that allows the device to check for mail and other notifications on a regular basis while the MacBook is “sleeping”) will still perform Time Machine backups.
Provided that you didn’t uncheck the “Show Time Machine in menu bar” box described earlier, you’ll be able to see when a backup is taking place. Here’s what the Time Machine menu bar icon will look like under different conditions:
Time Machine is idle
This indicates that Time Machine is currently idle

Time Machine Backup In ProgressThe extra arrow in this icon indicates that Time Machine is working on a backup. On older versions of Time Machine, the arrow would move in a circle, which many Mac users found to be endlessly distracting.

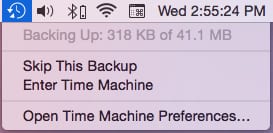
Time Machine AlertTime Machine AlertIf you see either one of these icons, it means that something has happened that’s preventing Time Machine from backing up. Clicking on the Time Machine menu bar icon can show what’s causing the problem, or can just (as in the image below) display the current progress of a backup.
Time Machine Backup in progress

Let’s say you’ve just finished working on a very important document. To make sure that it’s safe from a possible drive failure on your Mac, you can manually start a Time Machine backup. From the Time Machine menu, select “Back Up Now” to start things up.
Back Up Now

On occasion, it’s good practice to verify the backup disk to make sure it is sound. Selecting this menu while pressing the Option key provides the option of verifying backups or even switching to a different backup disk.
Restoring files or versions of files from Time Machine Backups
The entire reason you use Time Machine to back up your Mac is to be able to retrieve accidentally deleted or corrupted files, or to restore an entire system if your primary (usually internal) storage fails. In this section, we’ll show you how to restore a file from a particular point in time. If you need information on how to restore an entire system, that’s later on in this article.
When looking for a file or folder on your Mac, switch to the Finder then choose “Enter Time Machine” from the Time Machine menu. Your Mac display transforms into something that looks like this:
Enter Time Machine
Image courtesy of Apple Inc.
On the right side of this window is a timeline showing various dates and times back until the oldest backup saved by Time Machine. To reach a specific point in time, click on the appropriate line on the timeline. If you’re not sure when you deleted or changed a file, use the up arrow located just to the right of the Finder window to travel “back in time”. When the folder or file you’re missing or that you changed appears, stop at that point in time.
Sometimes you know the name of the file that you’re looking for. You can search from the Time Machine Finder window by typing a search term into the Search field on the top right of the Finder window. Then use the up (back in time) arrow to have Time Machine search through the backups to find the file or folder.
To restore a file or folder, just select it by clicking on it, then click the “Restore” button seen below the Finder window. Unsure if it’s the right version of the file? Use Quick Look before you restore it by just pressing the space bar once you have selected the file.
When the file is restored, it’s actually copied to the Mac desktop or the folder that the file was originally in. Sometimes, you may be restoring an earlier version of a file with the same name as one that’s already in a folder — if that’s the case, you’ll be asked to select which of the two files to keep, or if you want to keep both. Right-clicking or control-clicking on a file in the Time Machine window display additional options.
Restoring or Reverting in Apps
Some apps — Pages being a perfect example — support a way to revert to earlier versions of documents while in the app. To do this, open a file that you want to revert to an earlier version of and then either select Enter Time Machine from the Time Machine menu, select File > Revert to > Browse All Versions from the menu bar (if this doesn’t exist, then the app doesn’t support Time Machine directly), or if you have a Time Machine icon in the Dock, click on it.
Every version of the document that has been saved appears on the screen in the now-familiar Time Machine timeline. Once you’ve found the version you wish to revert to, just click the Restore button underneath to copy it back to the present time.
Restoring a Mac From a Backup
One of the most depressing situations a Mac user can run into is having a primary storage device fail. But it doesn’t have to mean that you’re down and out! Once the drive has been replaced, it’s actually quite simple to restore the entire system from your Time Machine backup. Here’s what you do once there’s a new drive in your Mac:
1.) Connect the Mac and the Time Machine drive, and turn on the Time Machine drive. If the Time Machine drive is on the network — a AirPort Time Capsule, for example — make sure that the Mac is on the same network before proceeding.
2.) Either restart the Mac using Apple menu > Restart, or turn the Mac on if it’s currently shut down. Once the Mac boots and you hear the startup chime, hold down the Command (⌘) key and R key simultaneously. When the Apple logo appears on the screen, you can release the keys, and the Mac boots up from the Recovery partition stored on the drive and into OS X Utilities
3.) From the list of OS X Utilities, select “Restore From Time Machine Backup”, then click the Continue button.
4.) Next, select the Time Machine backup. If it’s on an external backup disk, select it by clicking on it, then click Continue. When the Time Machine backup is on an AirPort Time Capsule, select the network from the AirPort menu on the right side of the menu bar, select the Time Capsule, then click “Connect to Remote Disk”. Finally, if the Time Machine backup is stored on a network backup disk (for example, an external drive connected to a Wi-Fi router or an OS X server), select it, and then click “Connect to Remote Disk”
5.) You may be asked to enter a name and password to connect to the backup disk. If requested, enter the appropriate information, then click Connect.
6.) A list of the dates and times of backups appears. Select the one you want — usually the most recent — then follow the onscreen instructions to restore all data and settings onto your Mac.
Once the system has been restored, Time Machine will probably perform a full backup at the next scheduled backup time. This is perfectly normal, and the hourly backups begin again once the full back is done.
For a look at how one drive can be used for both Time Machine backups and for storing your files, please visit: http://blog.macsales.com/36128-yes-you-can-use-one-drive-for-time-machine-and-file-storage

Instalar MacOS Sierra no VMWare no Windows

In this article, I am going to show you how to install macOS Sierra 10.12 on VMware Workstation on Windows 10. In the past, 48 hours Apple just announced the next version of Mac book’s operation system that is called by the name macOS Sierra at WWDC 2016. Well, this time also Apple has made their changes on the new version of macOS Sierra, like the very first one is that, after fifteen years, Apple has finally ditched the “OS X” moniker. All things old are new again, and the new operating system will just be called “macOS.” We don’t yet know if Sierra carries a “10.12” version number, but with developers getting their hands on the OS later today, we should soon have that question answered.
Apple’s Craig Federighi ran through a whole bunch of new features to be included in the revised operating system. He started by mentioning Continuity and Auto-Unlock, which now combine to let you seamlessly unlock a desktop or laptop Mac merely by bringing your Apple Watch close, using what Federighi described as “time-of-flight networking” to detect the watch’s proximity. It was unclear from the presentation whether or not this feature is an Apple Watch exclusive; Federighi did not explicitly say that Auto-Unlock would work with iOS devices.
Related Post:
Anyway, I’m not going to tell any more about the updates that Apple made in this WWDC 2016 because here you will learn how to install macOS Sierra 10.12 on VMware. If you want to see what’s new in macOS Sierra, iOS, watchOS and tvOS, then click here for more information and updates.

Install macOS Sierra 10.12 on VMware

Update: The Steps below works on macOS Sierra 10.12 Final Version the nearly released by Apple. (20 September)
Now there are several materials that you have to download from the links below.

Step #1. Extract macOS Sierra Image File

Once you have downloaded the macOS Sierra image file, then you must extract it via WinRAR or 7zip. To unzip the file, just right-click on file then choose “Extract Here.“ It’ll take some minutes to obtain so wait for a while, before moving to the next step.
How to Install macOS Sierra 10.12 on VMware?
Extract macOS Sierra Zip file

Step #2. Install VMware Workstation on Your PC

Get the VMware from the link above. Once you have downloaded the VMware player, then Install it on your Windows PC. To install VMware, just click on the setup then hit Next and Next. Finally, click “Finished.” If you have installed already, then that’s okay.

Step #3. Install Patch Tool for VMware

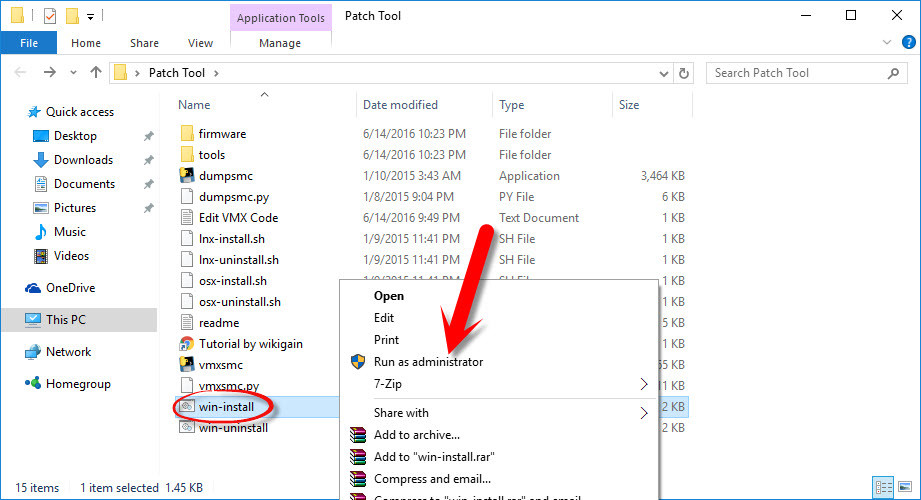
Open “Patch Tool” folder then navigate to win-install and Run as Administrator. It will install the patch file in the VMware player for macOS Sierra and older versions.
How to Install macOS Sierra 10.12 on VMware?
Install win-install file

Step #4. Create & Edit New Virtual Machine

#1. Now open VMware and click on “File>New Virtual Machine”(Ctrl+N) then select Typical(Recommended) and click Next.
How to Install macOS Sierra 10.12 on VMware?
Typical Configuration
#2. Choose “I will install the operating system later” and click Next.
How to Install macOS Sierra 10.12 on VMware?
Guest Operating System Installation
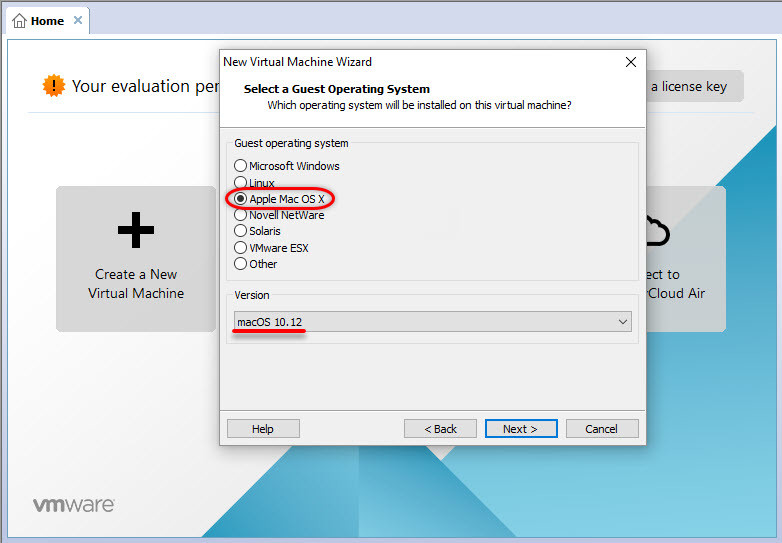
#3. Now select “Apple Mac OS X” from operating system list then select macOS 10.12 from version and click Next.
How to Install macOS Sierra 10.12 on VMware?
Select a Guest Operating System
#4. Name the virtual machine macOS Sierra then browse a location to install the VMX files and click Next.
How to Install macOS Sierra 10.12 on VMware?
Define Virtual Machine and Choose Path
#5. Don’t Specify the disk space just select Store virtual disk as a single file and click Next. Becuase we don’t need this; we will remove it later.
How to Install macOS Sierra 10.12 on VMware?
Specify Disk Capacity
#6. The VMX file for macOS Sierra has been created, so go ahead and click finish.
How to Install macOS Sierra 10.12 on VMware?
Ready to Create Virtual Machine

Step #5. Edit Virtual Machine (Ram, CPU, Hard Disk)

#1. Open the macOS Sierra VM window then click on Edit virtual machine settings.
How to Install macOS Sierra 10.12 on VMware?
Edit Virtual Machine settings
Note: Don’t run the Virtual Machine before the editing steps finished successfully because it may create problems for you on further steps.
#2. Increase the Ram memory from 2 GB to 4 GB of Ram memory.
How to Install macOS Sierra 10.12 on VMware?
Choose Memory or Memory
#3. Increase the CPU processor core from 2 cores to 4 cores.
How to Install macOS Sierra 10.12 on VMware?
Set Processor to 4
#4. Now select the hard disk and click Remove.
How to Install macOS Sierra 10.12 on VMware?
Remove Hard Disk
#5. When the previous hard drive removed then, click Add then select Hard Disk and click Next.
How to Install macOS Sierra 10.12 on VMware?
Select Hard Disk
#6. Select the SATA(Recommended) virtual disk type and click Next.
How to Install macOS Sierra 10.12 on VMware?
Select a Disk Type
#7. Now select “Use an existing virtual disk” then click Next.
How to Install macOS Sierra 10.12 on VMware?
Select Disk Type
#8. Click browse and choose the VMDK file from the extracted folder(Step 1), that downloaded macOS Sierra virtual machine(VM) image and tap Finish.
How to Install macOS Sierra 10.12 on VMware?
Select an Existing Disk

Step #6. Edit VMX File of macOS Sierra VM files

#1. Now navigate to macOS Sierra virtual machine files that you browsed and located in step 4,4. Then navigate to the VMware virtual machine(VMX) and open it with Notepad.
How to Install macOS Sierra 10.12 on VMware?
Edit Virtual Machine Code
#2. Scroll down to the end, and type (smc.version = “0”) then press Ctrl+S to save it.
How to Install macOS Sierra 10.12 on VMware?
Edit VMX File

Step #7. Play the Virtual Machine (macOS Sierra)

Open the macOS Sierra VM window then click Power on this virtual machine. When you played the VM, then it should take you to the next step setting up macOS Sierra in VMware.If no then you may miss any action or fail in any move, comment below and we will try our best for you.
How to Install macOS Sierra 10.12 on VMware?
Power on this virtual Machine

Step #8. Perform a Clean Installation of macOS Sierra

Now while installing macOS Sierra or El Capitan on VMware or VirtualBox then we don’t need to install that on separate disk because while editing the VM we choose the virtual disk type SATA, and this is the one and only way for now to install macOS Sierra or El Capitan on VMware or VirtualBox. So that’s why now in the very next step we have to perform a clean installation and to set up macOS Sierra.
#1. Choose your Country and click on Continue.
How to Install macOS Sierra 10.12 on VMware
Select Your Country
#2. Pick a keyboard Layout and click on Continue.
How to Install macOS Sierra 10.12 on VMware
Select your Keyboard
#3. Now choose your method to transfer information to this Mac and click on Continue.
How to Install macOS Sierra 10.12 on VMware
Transfer Information to this Mac
#4. Enable location services and click on Continue.
How to Install macOS Sierra 10.12 on VMware
Enable Location Services
#5. In this step, you have to Sign in with your Apple ID. If you have one, then create a free Apple ID to the article, how to create an Apple ID on iPhone, iPad or iPod Touch. If you don’t want to sign in with Apple ID or don’t want to create Apple ID, then Choose Don’t Sign in and Click on Continue.
How to Install macOS Sierra 10.12 on VMware
Sign In with Your Apple ID
#6. Agree to the Terms and Conditions.
How to Install macOS Sierra 10.12 on VMware
Terms and Conditions
#7. Fill out the Full name,  Account name, Password, Hint and check the box of Set time zone based on Current location. Then finally click on Continue to create your user account for Mac OS X El Capitan, which will be installed.
How to Install macOS Sierra 10.12 on VMware
Create a Computer Account
#8. Select the options for Diagnostics & Usage and click on Continue.
How to Install macOS Sierra 10.12 on VMware
Diagnostics & Usage
#9. Wait a little while to Setting Up Your Mac. Then it will run to the desktop of macOS Sierra.
How to Install macOS Sierra 10.12 on VMware
Setting up Your Mac

Finish Installation of macOS Sierra

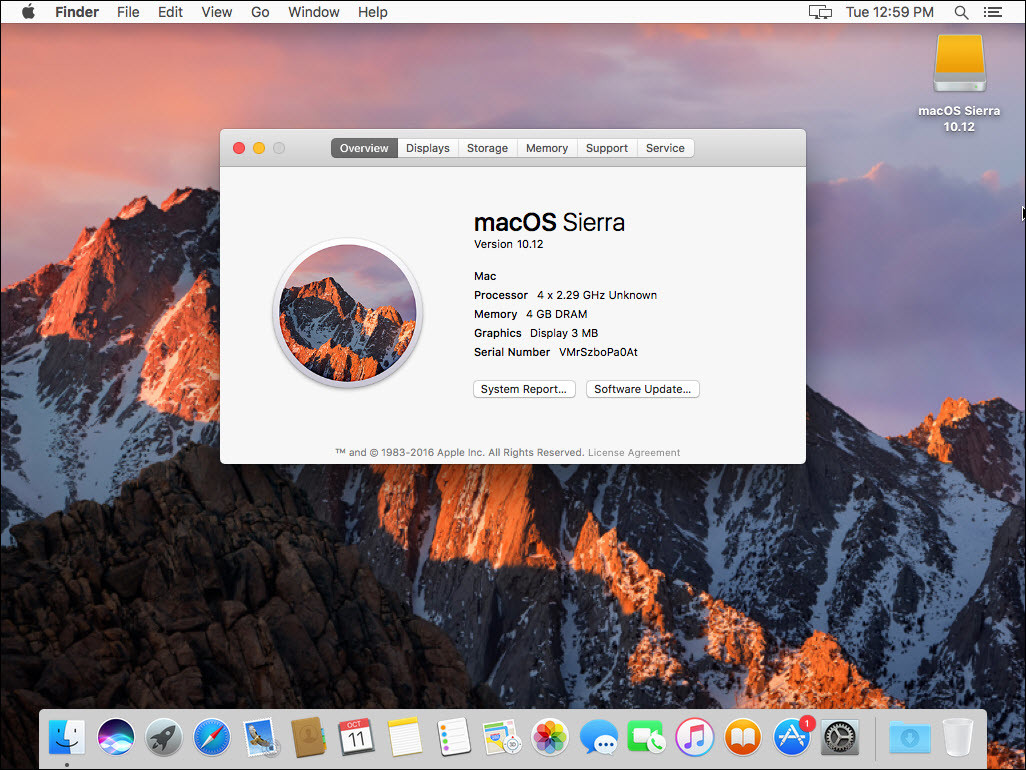
After performing a clean installation and Set upping your macOS Sierra then you should see your final result that, macOS Sierra has successfully installed on VMware.
For any kinds of error while installing Mac OS X El Capitan and macOS Sierra visit this article.
How to Install macOS Sierra 10.12 on VMware?
macOS Sierra Installed on VMware

Step #9. Install VMware Tools for macOS Sierra (Full-Screen Mode)

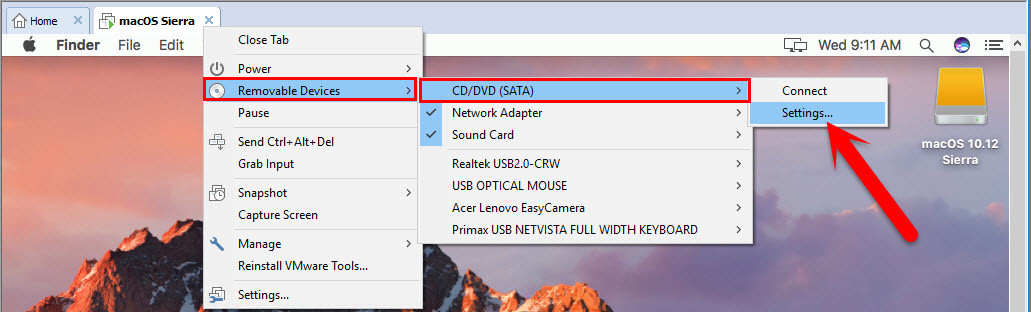
#1. Right Click on the macOS Sierra tab then click on Removable Devices > CD/DVD (SATA) > Settings.
How to Install macOS Sierra 10.12 on VMware?
OS X VM Settings
#2. From the Devices Status, Check the box of Connected and Connect at power on. Then from Connection section “Select Use ISO image file:” and click on browse.
How to Install macOS Sierra 10.12 on VMware?
Browse ISO Image file
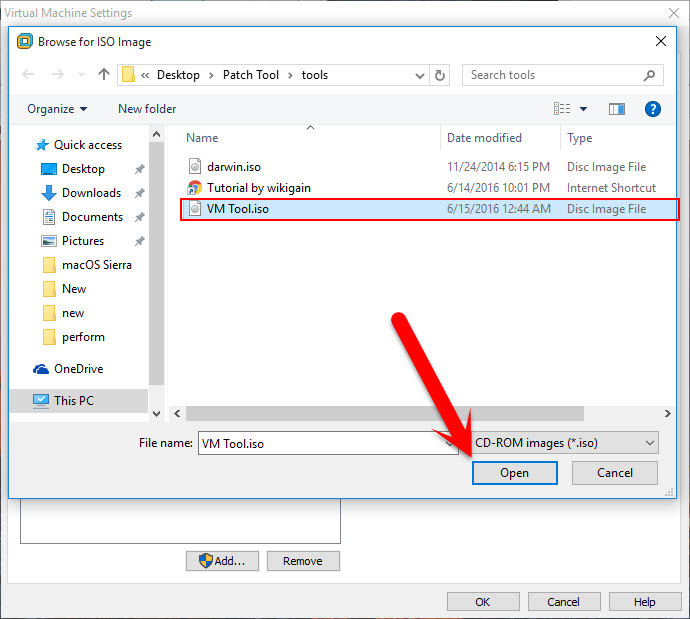
#3. Now Navigate to Patch Tool folder > Tools and select VM Tool.ISO file that you download and click Open.
How to Install macOS Sierra 10.12 on VMware?
Open VM Tools ISO File
#4. Now on the Virtual Machine settings click on OK to save the changes that you made.
How to Install macOS Sierra 10.12 on VMware?
Save the changes
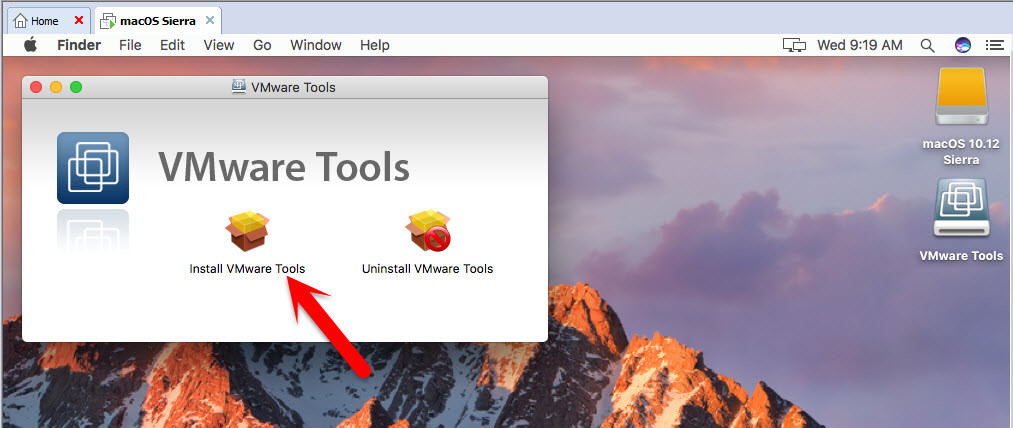
#5. After that go to OS VM and enter full-screen mode, Wait a while for the file and then it will run automatically, so when VMware Tools dialog box appears then click on Install VMware Tools.
How to Install macOS Sierra 10.12 on VMware?
Vmware Tools
#6. On introduction Page click on Continue.
How to Install macOS Sierra 10.12 on VMware?
VMware Tools Installer
#7. Then click on Install.
How to Install macOS Sierra 10.12 on VMware?
Install Now
#8. Again click on Continue Installation.
How to Install macOS Sierra 10.12 on VMware?
Continue Installation
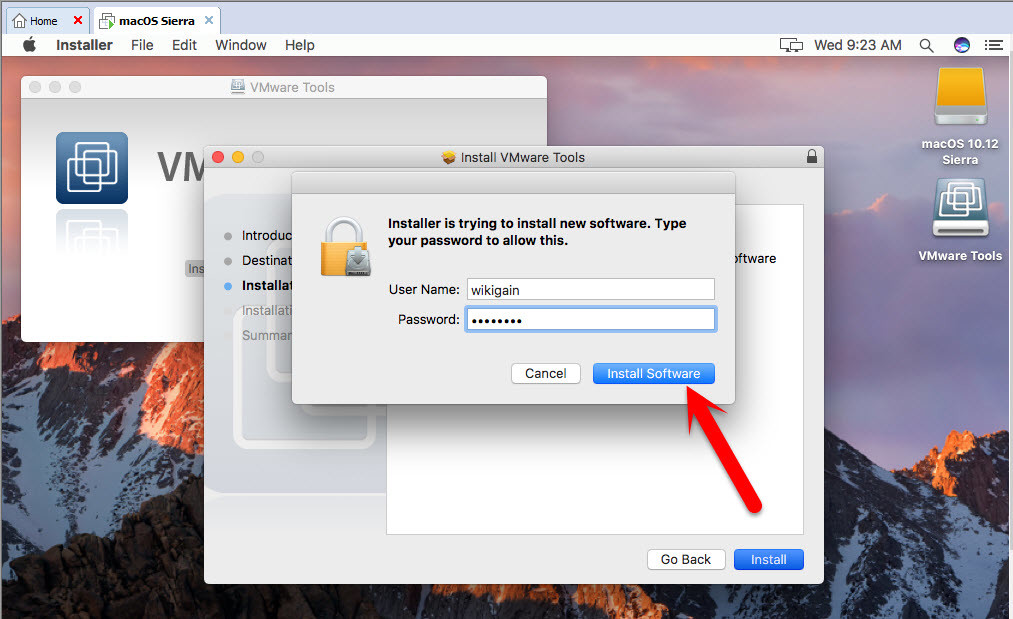
#9. Then type your Password and click on Install Software to allow this.
How to Install macOS Sierra 10.12 on VMware?
Install Software
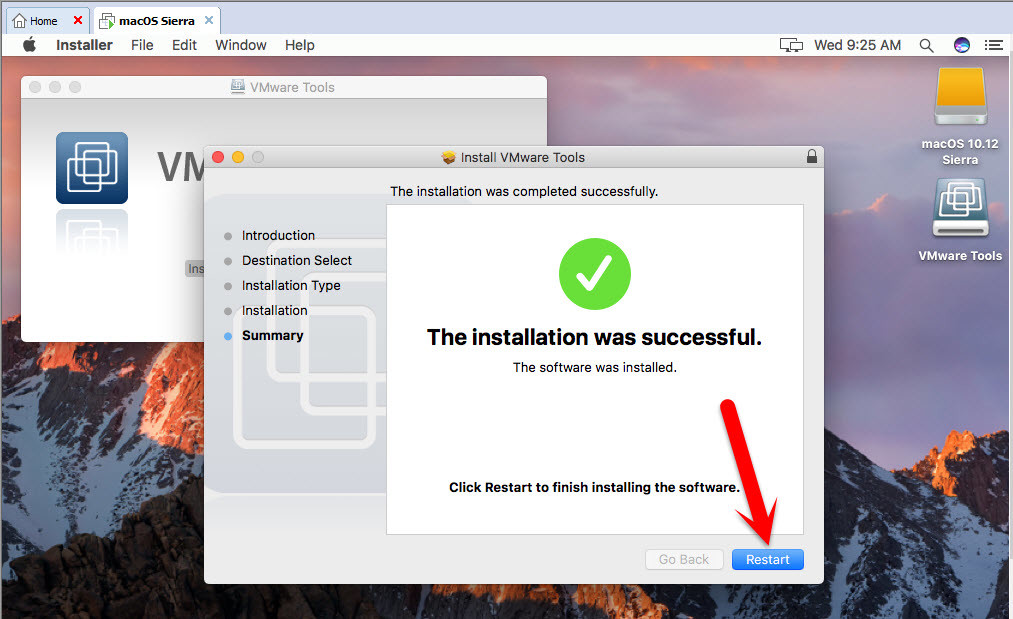
#10. Wait for Installer to complete the installation process and when the installation was Successful then click on Restart to finish installing the software.
How to Install macOS Sierra 10.12 on VMware?
Restart OS X VM

Done Installation of VMware Tools

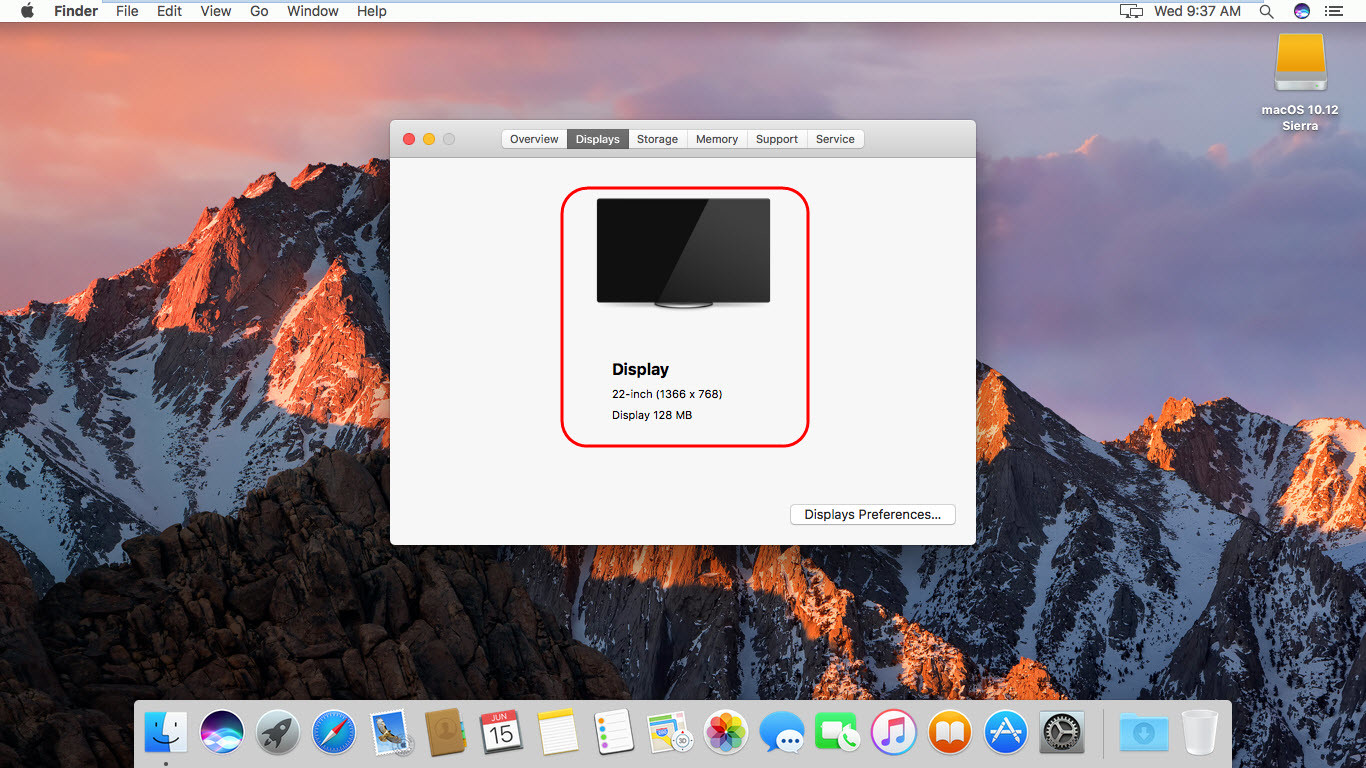
So when your OS VM reboots then VMware tools is installed on your VM, and it must work correctly like Auto selecting the Display Size and other drivers.
How to Install macOS Sierra 10.12 on VMware?
VMware Tools Installed

Install macOS Sierra on VMware Video Tutorial

It was all about, how to install macOS Sierra 10.12 on VMware. If you faced any problem tell us below by comment, feel free to say us. We’re waiting for your suggestion.

Como mover senhas e favoritos entre Microsoft Edge Chromium

  Press  Win + R  keys to open up the  Run  dialog box. Type  %LocalAppData%\Microsoft\Edge\User Data  and press  enter . Move the  Default ...