Mostrando postagens com marcador E-mail. Mostrar todas as postagens
Mostrando postagens com marcador E-mail. Mostrar todas as postagens
quinta-feira, 11 de abril de 2019
Onde fica a pasta de e-mails do App Mail no Windows 10
%userprofile%\appdata\local\Comms\unistore\data

quarta-feira, 26 de setembro de 2018
Aumentar tamanho limite email OST outlook
How to Increase OST file size limit in Outlook 2016/2013/2010/2007
This article emphasis on how we can increase the size of Outlook OST File. We explore some method and try to implement step by steps so that without any confusion, we easily raise the size capacity of .ost extension file in Outlook. After collecting the queries related size of Outlook offline storage file, it is important to know the reason behind and why we need to increase the size of OST file.
User Queries: How to Increase OST File Size Limit?
Question 1: Recently, my friend try to increase OST File size in Outlook 2016 via some kind of Registry option. Is this kind of Registry method is available that can increase size my OST File in Outlook? I am using Outlook 2013 versions. Waiting for a quality answer that can really help me, as the size of local OST file stored in the system becoming large.
Question 2: Working on Outlook 2010, heard about size limitation of Outlook OST File in Outlook 2010. Is this true, what happen my file cross the size limit, is there any method that can help me to increase OST file in Outlook 2010 Version.
Yes, There is an option available to increase the size of OST File in different Outlook Platforms from Outlook 2016/2013/2010 to Outlook 2007/2003. As different Microsoft Outlook Versions has different file size limitation on OST File, So the user has to take care of the size of the OST file, as the file stored locally in the user computer. Storage Capacity can be from 2 GB To 50 GB. But you can increase OST File size in Outlook via Registry. Just follow steps of below section to easily improve the storage capacity of .ost file extension.
Microsoft Offers 4 registry entries such as MaxFileSize, MaxLargeFileSize, WarnFileSize and last WarnLargeFileSize. From these file two file used to Warn the user, after reaching limit defined by the user. Wheresas other two files used to defined Maximum File size of OST File in Outlook. MaxFileSize & WarnFileSize registry entries used to increase OST File size in Outlook 2007 & earlier version of Outlook[2003] application supports ANSI [American National Standards Institute] format. On other hand MaxLargeFileSize &WarnLargeFileSize supports Unicode [Universal Encoding]. While in ANSI format, values of size inform of bytes and Unicode supports Megabyte format.
Simple Steps to Increase Outlook OST File Size Limit in 2016/2013/2010
In this method, User has to find the correct Registry Path to set the values of registry entries in the appropriate places using Registry Editor. A user has to be careful while creating these entries and providing the right values to raise the storage capacity of OST File.
The table holds Registry entries Path Details:
| Outlook Version | Registry Entries Path |
| Outlook 2016 | HKEY_CURRENT_USER\Software\Microsoft\Office\16.0\Outlook |
| Outlook 2013 | HKEY_CURRENT_USER\Software\Microsoft\Office\15.0\Outlook\ |
| Outlook 2010 | HKEY_CURRENT_USER\Software\Microsoft\Office\14.0\Outlook\ |
| Outlook 2007 | HKEY_CURRENT_USER\Software\Microsoft\Office\12.0\Outlook\ |
| Outlook 2003 | HKEY_CURRENT_USER\Software\Microsoft\Office\11.0\Outlook\ |
Similarly, While working as Administrator to increase the size of OST File different version such as Outlook 2013 & other versions,
| Outlook Version | Registry Entries Path |
| Outlook 2016 | HKEY_CURRENT_USER\Software\Policies\Microsoft\Office\16.0\Outlook |
| Outlook 2013 | HKEY_CURRENT_USER\Software\Policies\Microsoft\Office\15.0\Outlook |
| Outlook 2010 | HKEY_CURRENT_USER\Software\Policies\Microsoft\Office\14.0\Outlook |
| Outlook 2007 | HKEY_CURRENT_USER\Software\Policies\Microsoft\Office\12.0\Outlook |
| Outlook 2003 | HKEY_CURRENT_USER\Software\Policies\Microsoft\Office\11.0\Outlook |
Note: IF Folder not created of PST/OST, then a user can create NEW Folder of OST/ PST.
To Understand properly, Let take the example of Office 2016 in Windows 8.
1) To Open Registry Editor, Open Run Command >> Type “regedit“.
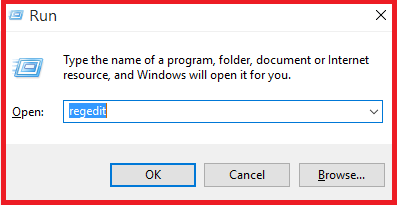
2) Run the EXE and according to Outlook versions, Follow the defined path in above Table.
3) Follow the Path and Click on PST Folder.
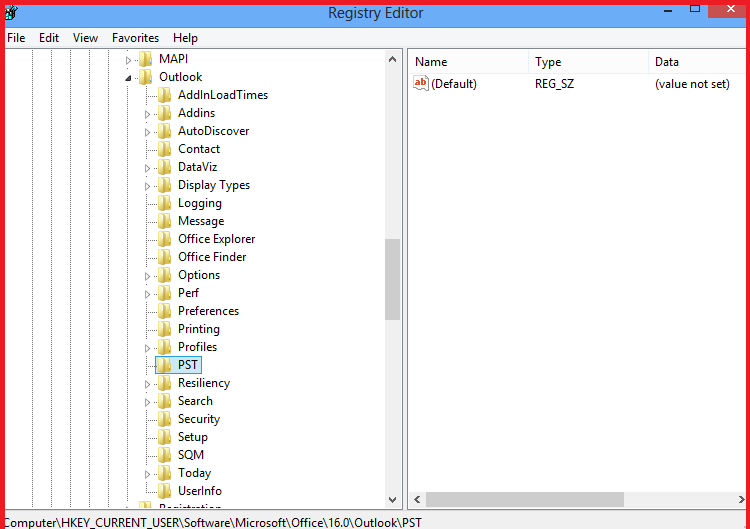
Note: If OST/PST Folder is not created inside Outlook folder, user have to create OST/PST Folder.
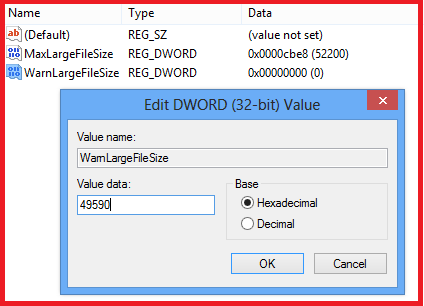
4) Now, user have to create two new file
- Right Click >> Create Two New Select Dword File and type “ WarnLargeFileSize ” & “MaxLargeFileSize “
5) Now set the Value Data to increase the size of OST file in MaxLargeFileSize
- Select MaxLargeFileSize >> Click Right >> Select Modify.
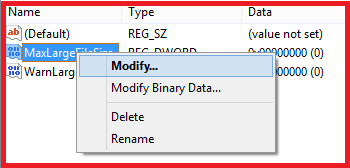
- Now Set Value data in Decimal Format
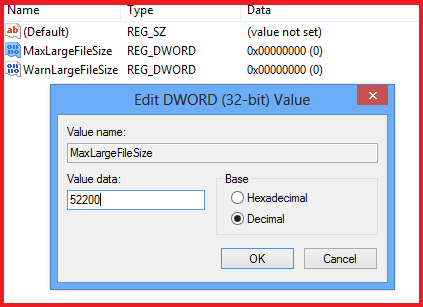
6) Also set the Value Data in WarnLargeFileSize so that whenever the size of OST File reached to limit, user get notify.
Points to Remember
While increasing the OST File size limit in Outlook 2016/2013, Outlook 2010/2007 & other below version, a user has to remember these points.
- There should be the difference of 5% between the size of Warning size and Main file size.
- Size of MaxLargeFileSize should not be greater than 4294967295[Decimal Form] & f3cf3cfe in Hexadecimal format
- Size of WarnLargeFileSize should not be greater than 4090445042 [Decimal Form] & fffffff in Hexadecimal format.
- If OST/PST Folder is not created in Outlook Folder, then user have to create it
Conclusion
In Outlook 2016/2013/2007 the Size of OST File is different than the earlier version and to increase Outlook OST size limit to store more mailbox data, user can do changes in Registry entries using Registry Editor. Follow the mentioned method properly while changing the value data entries and creating the file. A user can take backup of files before proceeding towards the methods. Hope this article help user to find the queries related to “How they can increase OST File size in Outlook 2016/2013/2010 application & below versions[Outlook 2007/2003] “. and assist the user in improving the efficiency of Outlook Application.
quinta-feira, 1 de março de 2018
Encaminhar emails do Office 365 para outra conta de email
- Basta acessar o link https://outlook.office.com/owa/?path=/options/forwarding
- Será solicitado seu email e senha da Alper
- Selecione "Manter uma cópia das mensagens encaminhadas"

sexta-feira, 16 de fevereiro de 2018


segunda-feira, 26 de junho de 2017
Adicionar ou Remover Conta de Email Exchange no Android e Iphone
NO ANDROID
Para remover a conta antiga:
Ir em Configurações > Contas > (seu email antigo) > Clique na conta e Remover conta
Saiba mais...
Para adicionar uma nova conta:
Para adicionar a nova conta:
Ir em Ajustes > E-mail > Contas > Adicionar Conta > Escolha o tipo da conta (Office 365 ou Exchange)
Para adicionar uma nova conta:
- Baixe o APP em Microsoft Outlook
- Em seguida, abra o Outlook no seu Android > Adicionar conta > digite o email da conta, depois CONTINUAR, digite sua senha do e-mail
- Escolha o tipo da conta (Office 365)
NO IPHONE
Como remover a conta antiga (Clique Aqui)Para adicionar a nova conta:
Ir em Ajustes > E-mail > Contas > Adicionar Conta > Escolha o tipo da conta (Office 365 ou Exchange)
Coloque seu email e senha (mesma utilizada no computador).
Se aparecer alguma tela de confirmação, pressione OK.
Se aparecer alguma tela de confirmação, pressione OK.
terça-feira, 20 de junho de 2017
Como configurar o auto complete (preenchimento automatico dos contatos) no Outlook em uma nova conta
- Create a new message.
- Press the To… button.
- Select the contact list in the right top corner from which you would like to add the contacts from.
- Examples; Contacts folder, Global Address List (GAL) or a contacts folder in a Public folder.
- Examples; Contacts folder, Global Address List (GAL) or a contacts folder in a Public folder.
- Select the first contact.
- Scroll all the way down to your last contact.
- Hold the SHIFT button on your keyboard while clicking on the last contact to select them all.
- Press the To –> button to add them all to the To… field.
- Repeat step 3 to 7 if you have contacts in additional lists that you would like to add.
- Press OK to close the dialog and to return to the newly created message.
- Now, depending on your Outlook version, do the following;
- Outlook 2007 or previous
Close the message and press No when prompted to save changes. - Outlook 2010, Outlook 2013 and Outlook 2016
You must send the message to actually store these addresses in the AutoSuggest cache. However, by placing Outlook in Offline Mode first via the Send/Receive tab, you can easily prevent it from actually being sent by removing it from the Outbox and then place Outlook back online mode.
- Outlook 2007 or previous
Now when you address a new message, the AutoSuggest/Auto-Complete feature will pop-up again.
Atrasar a entrega de uma mensagem no Outlook
- Na mensagem, clique em Opções.
- No grupo Mais Opções, clique em Atrasar Entrega.
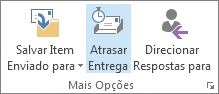
- Em Opções de entrega, marque a caixa de seleção Não entregar antes de e clique na data e na hora de entrega desejadas.
Depois que você clica em Enviar, o email permanece na pasta Caixa de Saída até o tempo da entrega.
Se você decidir depois que deseja enviar a mensagem imediatamente, proceda da seguinte forma:
- Em Email, no painel de pastas, clique na pasta Caixa de Saída.
- Abra a mensagem atrasada.
- Clique em Opções.
- No grupo Mais Opções, clique em Atrasar Entrega.
- Em Opções de entrega, desmarque a caixa de seleção Não entregar antes de.
- Clique em Fechar.
- Clique em Enviar.
Atrasar a entrega de todas as mensagens
- Clique na guia Arquivo.
- Clique em Gerenciar Regras e Alertas.
- Clique em Nova Regra.
- Na caixa Etapa 1: selecione um modelo, em Iniciar com base em uma regra em branco, clique em Aplicar regra em mensagens que eu enviar e em Avançar.
- Na lista Etapa 1: selecione as condições, marque as caixas de seleção das opções desejadas e clique em Avançar.Se você não marcar uma caixa, será exibida uma caixa de diálogo e, se você clicar em Sim, a regra que está sendo criada será aplicada a todas as mensagens enviadas.
- Na lista Etapa 1: selecione as ações, marque a caixa de seleção adiar entrega por um número de minutos.
- Na caixa Etapa 2: edite a descrição da regra (clique em um valor sublinhado), clique na frase sublinhada, um número de e insira o número de minutos durante os quais você deseja que as mensagens sejam mantidas antes do envio.A entrega pode ser atrasada em até 120 minutos.
- Clique em OK e clique em Avançar.
- Marque as caixas de seleção das exceções desejadas.
- Clique em Avançar.
- Na caixa Etapa 1: especifique um nome para esta regra, digite um nome para a regra.
- Marque a caixa de seleção Ativar esta regra.
- Clique em Concluir.
Depois que você clica em Enviar, todos os emails permanecem na pasta Caixa de Saída pelo tempo especificado.
Assinar:
Postagens (Atom)
-
If you are receiving an error Destination Path Too Long when trying to copy or move a file to a folder, try the quick trick below. The re...
-
O Time Machine faz backup de todos os seus arquivos para um disco rígido externo para que você possa restaurá-los mais tarde ou consultar a...

