- Open a Windows Explorer window
- Right-click anywhere that's blank and choose Customize this folder
- Choose General Items from the Optimize this folder for list box, then click OK
- In Windows Explorer, open the Tools menu and click Folder Options
- On the View tab click on Apply to Folders then click OK
quinta-feira, 23 de janeiro de 2020
Personalizar colunas Explorer Windows 10

How to disable Windows Defender in Windows 10 permanently
Windows Defender is the default antivirus solution of Windows 10 just like it has been on Windows 8. The program is enabled by default and will turn itself off if another antivirus solution is installed provided that it is recognized by the operating system.
One core difference between the implementation on Windows 8 and 10 is that you cannot turn off Windows Defender completely anymore using the preferences provided in the application.
A click on Settings in Windows Defender opens the control panel for the program in the new Windows Settings application. While you find options to toggle the program's real-time protection there, it is indicated right on the page that this is just a temporary state change.
You can turn this off temporarily, but if it's off for a while we'll turn it back on automatically.
It is unclear why Microsoft made the decision to change the behavior of Windows Defender in this regard. What is certain however is that it will annoy users who want to disable it permanently on the computer they are working on.
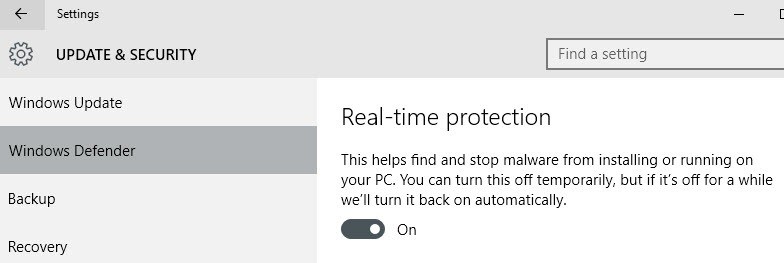
While you could go ahead and disable Windows Defender whenever it enables itself automatically again, you may prefer a solution that is permanent.
There are two options that you have to disable Windows Defender permanently on a system running Windows 10. Please note that one of the methods is only available in some versions of Windows.
Method 1: Disabling Windows Defender using the Group Policy
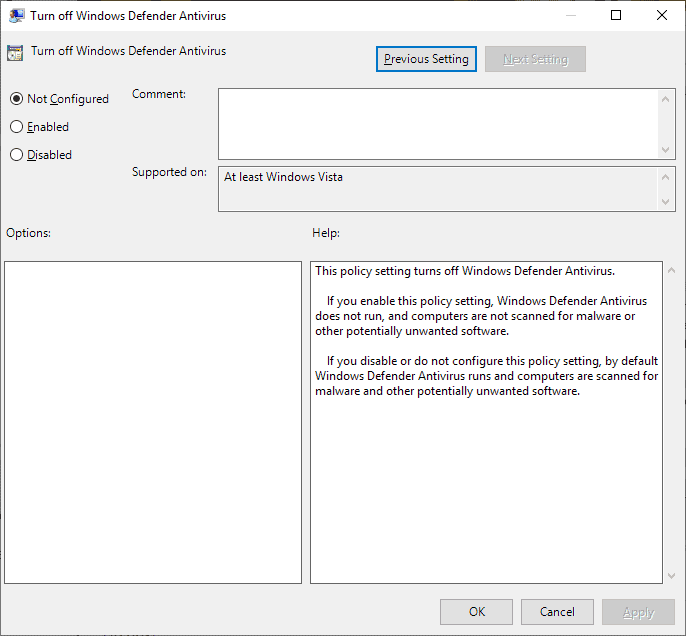
The Group Policy Editor is only part of Windows 10 Pro and Enterprise. To turn off Windows Defender using it do the following:
- Tap on the Windows-key to open the Start Menu.
- Type gpedit.msc and hit enter.
- Confirm the UAC prompt to continue.
- You find the setting by following this path: Local Computer Policy > Computer Configuration > Administrative Templates > Windows Components > Windows Defender Antivirus.
- There you find the policy "Turn off Windows Defender Antivirus".
- Double-click on the policy.
- Set the state of the policy to enabled in the window that opens, and click ok to save the change.
The policy reads:
This policy setting turns off Windows Defender.If you enable this policy setting, Windows Defender does not run, and computers are not scanned for malware or other potentially unwanted software.If you disable or do not configure this policy setting, by default Windows Defender runs and computers are scanned for malware and other potentially unwanted software.
Windows Defender is disabled immediately when you make the change. Any attempt to run the program afterwards results in the following error message.
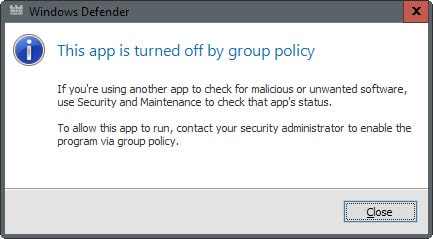
To restore the functionality of the app, set the policy state to disabled or not configured.
Method 2: Disabling Windows Defender using the Windows Registry
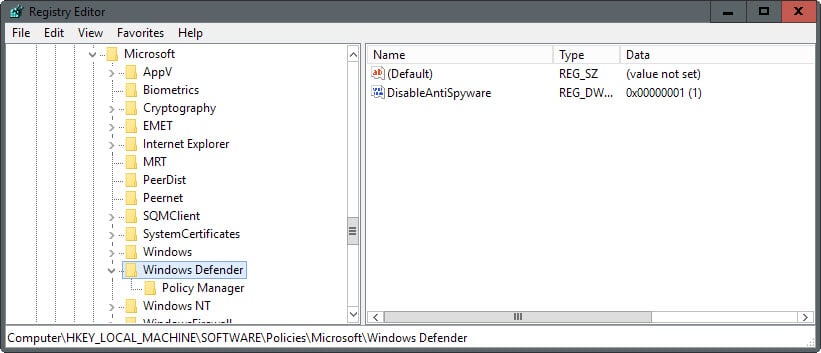
You may disable Windows Defender in the Windows Registry as well. Basically, it is the same setting that gets written to it when you disable the application in the Group Policy Editor.
- Tap on the Windows-key to open the Start Menu.
- Type regedit.exe and hit enter.
- Confirm the UAC prompt to continue.
- Navigate to the following key: HKEY_LOCAL_MACHINE\SOFTWARE\Policies\Microsoft\Windows Defender
- If you see the preference DisableAntiSpyware on the right double-click on it and set it to 1 to disable Windows Defender.
- If the preference does not exist, right-click on Windows Defender and select New > Dword (32-bit) Value, and name it DisableAntiSpyware.
- Go to HKEY_LOCAL_MACHINE\SOFTWARE\Policies\Microsoft\Windows Defender\Real-Time Protection
- Right-click on Real-Time Protection and select New > Dword (32-bit) Value, and name it DisableRealtimeMonitoring.
- Set the value to 1.
To restore Windows Defender at a later point in time, delete the key or set its value to 0.
Method 3: Normal disable and Task Scheduler
If both methods outlined above don't work, you may still have another ace up your sleeve that you can try out.
- Tap on the Windows-key to open the Start Menu.
- Type taskschd.msc and hit enter to open the Windows Task Scheduler.
- You may get an UAC prompt that you need to accept.
- Navigate to Task Scheduler Library > Microsoft > Windows > Windows Defender.
- There you find "Windows Defender Scheduled Scan" which you need to double-click on.
- Switch to the Conditions tab when the window opens.
- Select "Start the task only if the computer is idle for" and set a large idle time amount there to prevent it from being run on the system.
Method 4: NoDefender

If none of the methods work in your case, you may want to try the free program NoDefender, a third party application to turn off Windows Defender on computers running Windows 10.
This should only be a last resort as it is not entirely clear what the program does in the background when you run it.
segunda-feira, 2 de dezembro de 2019
How to remove OneDrive from File Explorer on Windows 10

OneDrive can be considered one of the best cloud storage service you can use. If you're a PC user, OneDrive even comes built-in on Windows 10. It also adds an entry to the left pane in File Explorer, which if you might not want to see if you're not a OneDrive user — or you're an advanced user that syncs everything automatically to OneDrive.
While Windows 10 doesn't include an option to remove the OneDrive shortcut, you can jump into the Registry to remove the shortcut manually.
In this Windows 10 guide, we'll walk you through the steps to tweak the Registry to remove the OneDrive entry in the left pane of File Explorer, but without ditching the service completely in case you need to manage or upload files to the cloud.
How to remove OneDrive from File Explorer
Important: As always, this is a friendly reminder warning that editing the registry is risky, and it can cause irreversible damage to your installation if you don't do it correctly. It's recommended to make a full backup of your computer before proceeding.
- Use the Windows key + R keyboard shortcut to open the Run command.
- Type regedit, and click OK to open the registry.
- Browse the following path:
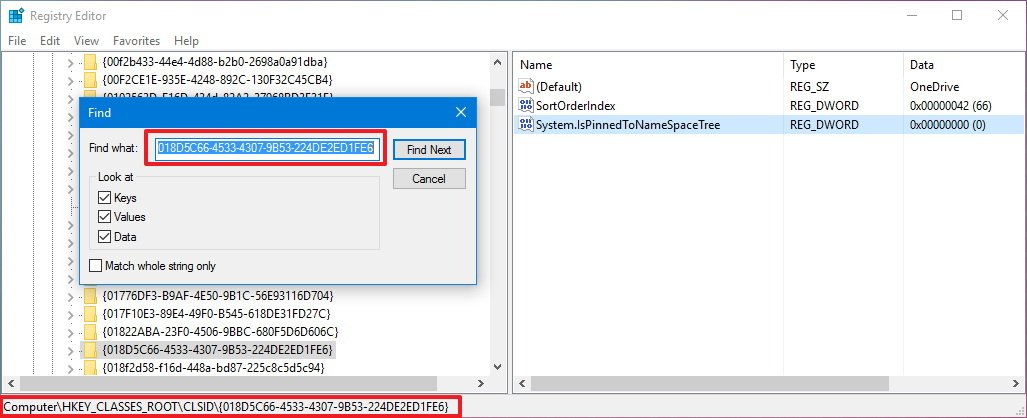
HKEY_CLASSES_ROOT\CLSID\{018D5C66-4533-4307-9B53-224DE2ED1FE6}If you're having difficulties finding this particular entry, do the following:- Use the Ctrl + F keyboard shortcut to open Find.
- Copy and paste the Registry entry you're looking for, in this case:
018D5C66-4533-4307-9B53-224DE2ED1FE6 - Click Find Next to start a search.

This particular entry can be repeated multiple times in the database, as such make sure to click the Find Next button several times until the Status Bar at the bottom of the Registry reads: Computer\HKEY_CLASSES_ROOT\CLSID{018D5C66-4533-4307-9B53-224DE2ED1FE6}. - Select the {018D5C66-4533-4307-9B53-224DE2ED1FE6} key, and on the right side, double-click the System.IsPinnedToNameSpaceTree DWORD.
- Change the DWORD value from 1 to 0.

- Close the Registry to complete the task.

Once you completed the steps, close and reopen File Explorer, and you should no longer see the OneDrive entry on the left pane. If you don't see the change, try restarting your PC.
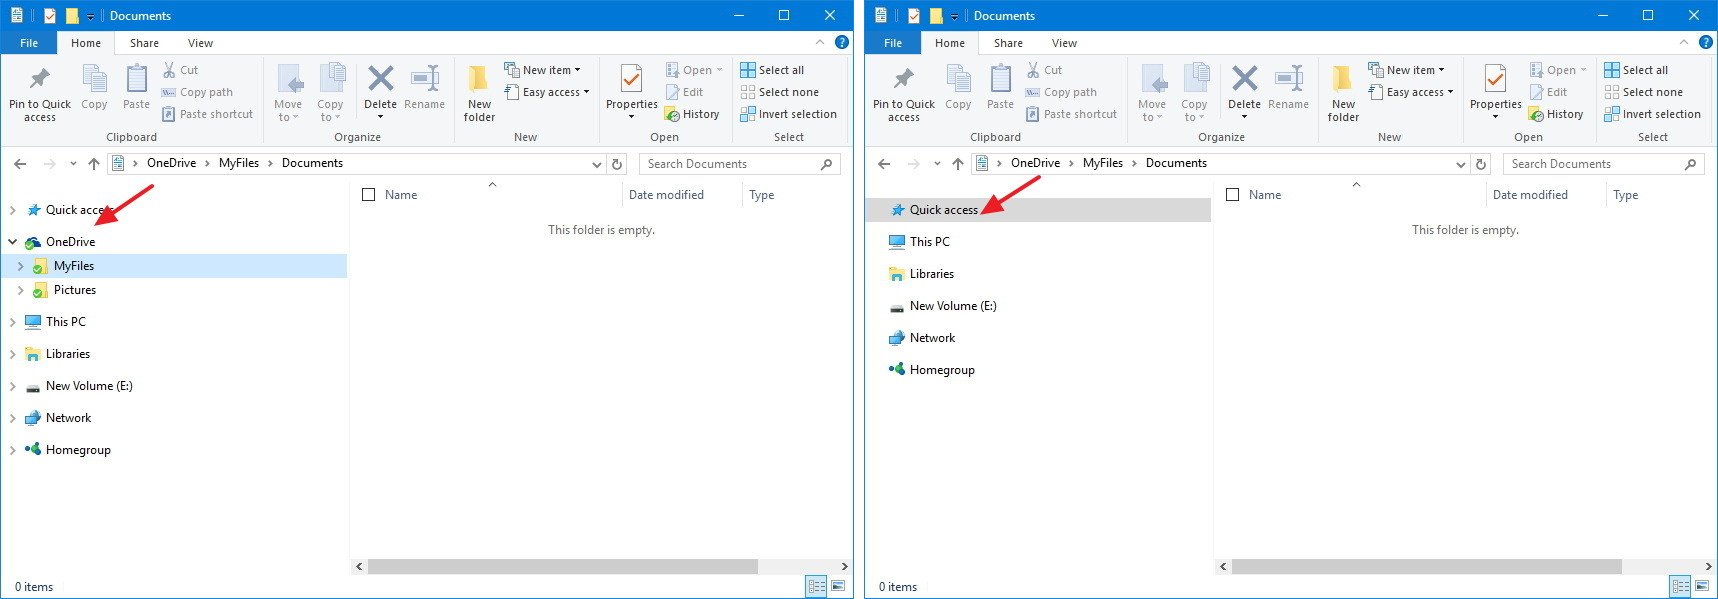 File Explorer with OneDrive (left), File Explorer without OneDrive (right)
Quick Tip: If you ever need to access the OneDrive root folder, simply type OneDrive in the address bar of File Explorer and press Enter.
If you want to revert the changes, follow the same steps mentioned above, but this time on step 5 change the System.IsPinnedToNameSpaceTree DWORD value from 0 to 1.
Keep in mind that this won't uninstall the OneDrive client from Windows 10, we're simply removing the entry from File Explorer when you don't have a use for it.
domingo, 1 de dezembro de 2019
Destination Path Too Long Fix (when Moving/Copying a File)
If you are receiving an error Destination Path Too Long when trying to copy or move a file to a folder, try the quick trick below. The reason you are receiving the error is that File Explorer failed to copy/delete/rename any path-name longer than 256 characters. The instructions below apply to Windows XP, Windows 7, Windows 8, Windows 10, Windows Server 2003, Windows Server 2008, and Windows Server 2012R2/2016/2019.
This is not the limitation of NTFS file system, but the Win32 API library. MAX_PATH value in Win32 API is 260. Most standard applications, including Windows Explorer (File Explorer), do not work correctly with files long paths exceeding 256 characters. Under the file name, Windows understands the entire path, starting with the root of the drive, ending with the last subfolder and the file name itself.
When using Unicode API functions, it is possible to use a path of up to 32767 characters. Thanks to this, many third-party programs (the popular file managers, for example FAR and Total Commander) process files/folders without any problems, the path length to which exceeds 256 characters.
Note. Some programs use the UNC file path format (prefixed with \\?\) to bypass the limitations of the Win32 API. For example, the absolute file path might look like this: \\?\C:\folder1\subfolder1\toolongfilename
Due to max path length limitations, the administrator may encounter the following problems:
- Users can create files and folders in a shared network folder that the administrator (or management scripts) cannot access locally;
- Errors when synchronizing roaming profiles;
- Errors data recovery from shadow copies;
- Incorrect calculation of the directories size;
- Lost files during migration and data transfer between servers, etc.
Destination Path Too Long Fix
Full Error: “The file name(s) would be too long for the destination folder. You can shorten the file name and try again, or try a location that has a shorter path.”
Screenshot of Destination Path Too Long error on Windows Server 2008

Screenshot of Destination Path Too Long error on Windows 8:

Solution 1. Rename Parent Folder to Decrease the Full Path
The simplest way is to shorten the name of the parent folders, decreasing the total path length (but not always applicable) by simply renaming it.
Solution 2. Create a symbolic link
Another option is to create a symbolic link to a part of the path, thus shortening the total path length. To create a link you can use the following command:
mklink /d c:\home\link “C:\verylongpathhere……”
Next, perform file operations with the directory to which the symbolic link is assigned (c:\home\link in our case).
Solution 3. Use Subst utility
Another option is to associate the problem folder to a virtual disk (in our example, Z:), using the built-in utility Subst. Thus, you can also shorten the path length:
Subst Z: “C:\verylongpathhere……”
Now you can work with the data on the Z: drive, the path to the files in which will not exceed the Win32 API path limit. After your job is finished, you can delete the virtual disk using the Subst with the /d option:
Subst Z: /d
Solution 4. Hidden share path
Step 1
The quickest fix for this, especially if you are needing to simply migrate (move) a lot of folders from one place to another is to map a drive to the drilled down the folder.
What you should is browse to the hidden share path and copy it to your clipboard.

Step 2
Then browse to “Computer” or “My Computer” and click on Map Network Drive. Depending on your OS it might appear under the tools menu.

Step 3
Then simply paste your long folder path and hit Finish.

Step 4
Now you will be able to copy the files/folders into this location without receiving the error.
Solution 5. How to Enable Long Path Support in Windows 10 (1607) and higher
In Windows 10 Anniversary Update (1607), it became possible to disable the MAX_PATH limit on the Windows operation system level without using prefix \\?\. By default, this feature is disabled.
To enable the built-in support for long paths in Windows 10/Windows Server 2016, you can use the Regedit.exe editor to set the LongPathsEnabled parameter of REG_DWORD in the registry key HKLM\SYSTEM\CurrentControlSet\Control\FileSystem with a value 1.

You can change this registry parameter with the following PowerShell command:
Set-ItemProperty -Path HKLM:\SYSTEM\CurrentControlSet\Control\FileSystem -Name LongPathsEnabled -Value 1
Or you can enable long path support via Group Policy Editor (Win + R \ gpedit.msc) Computer Configuration > Administrative Templates > System > Filesystem. Enable the policy Enable NTFS long paths.

For the changes to take effect in both cases, the computer needs to be rebooted. After a reboot, users and programs will be able to work without restrictions with files, the length of the path to which exceeds 256 characters. Now the files will only be affected by the NTFS file system file path limit of 32767 characters.
However, in some applications, the MAX_PATH check is embedded in the code. About the max file path restrictions for .Net developers, see the Solution 7 below.
Solution 6. Using Robocopy Utility to Copy and Move Files
To copy or move data, you can use the built-in console Windows tool — robocopy. The robocopy utility allows you to correctly copy and synchronize files and directories with long paths.
For example, if you cannot delete the directory due to the path length limit, you can first move data from the directory using robocopy:
ROBOCOPY c:\folder1\folder2\folder3\longpath\ c:\tmp\ /MOVE /E

After that, you can delete the source directory:
Delete c:\folder1\folder2\folder3\longpath /q /f
Solution 7. Long File Path for .Net Developers
The Base Class Library (BCL) of the development environment for the .Net Framework has a built-in preliminary check for the admissibility of long directory and file names. Therefore .Net Framework developers may encounter a System.IO.PathTooLongException error in their programs.
Check for path length removed from BCL code in .Net Framework 4.6.2. Therefore, developers after updating the version of .Net Framework can use long paths in the UNC path format (\\?\C:\Very_long_path) or when the LongPathsEnabled parameter is enabled in Windows 10/Windows Server 2016, it is possible to work with files with paths of almost any length correctly.
To do this, use Net Framework 4.6.2 (and newer) when building applications, or for older app versions (.Net 4.0), use the following application configuration file:
<?xml version=”1.0″ encoding=”utf-8″?>
<configuration>
<startup>
<supportedRuntime version=”v4.0″ sku=”.NETFramework,Version=v4.0″/>
</startup>
<runtime>
<AppContextSwitchOverrides value=”Switch.System.IO.UseLegacyPathHandling=false;Switch.System.IO.BlockLongPaths=false” />
</runtime>
</configuration>
Solution 8. Long File Path in PowerShell .Net Developers
Because PowerShell is based on .Net, in order for the Get-Item, Get-ChildItem, Remove-Item, etc. cmdlets to work correctly with long file paths, you need to upgrade the .NET Framework to 4.5 or newer and install Windows Management Framework 5.1.
Tip. The current version of PowerShell can be found in the variable $PSVersionTable.
After that, when using file cmdlets instead of Path, you need to use the LiteralPath parameter. For example:
Get-ChildItem -literalpath \?\C:\PS

Tip #1
There also is a great tool called “Long Path Tool” that works great to fix this: https://longpathtool.com/. However it isn’t free, the methods above are.
Tip #2
Thank you, Colin Albright, for the comment below. Yes, you can also use 7-zip or any zip utility to fix Destination Path Too Long problem. Sometimes on single files, this could be a better and faster solution. Just zip the folder up, and your good to go.
sexta-feira, 22 de novembro de 2019
Alternativas Sincronização OneDrive
Habits can be hard to break, but sometimes it’s worth learning to do something differently if it makes life easier. That’s certainly the case when it comes to cloud file storage, because there’s nothing more inefficient than emailing files to colleagues or partners — especially when that involves multiple edits by a team over a period of time.
Microsoft has recently been evangelizing its ‘one source of truth’ paradigm, alongside Office 365 Groups, and the ability to send Modern Attachments directly from OneDrive for Business using Outlook 2016 Preview or the online version of Outlook. For more information on what’s new with Office 365 Groups, see New Features in Office 365 Groups on the Petri IT Knowledgebase.
One source of truth is based around the idea of using cloud storage for hosting master copies of your files and maintaining up-to-date versions in one place, even if other copies of the same files are edited offline or across different devices. This avoids the issue of multiple versions of files being distributed among team members by email or removable storage, where no one is quite sure which version is most current.
OneDrive, OneDrive for Business, or Sites (SharePoint Online)
In OneDrive versus OneDrive for Business on Petri, I ran through some fundamental differences between the two products, including the two separate sync clients. At this point it’’ worth mentioning Office 365 Sites, because although OneDrive for Business is based on SharePoint, it’s intended for use as personal storage, with the ability to share documents when needed. But Microsoft’s solution for sharing documents with a team of people is Sites, which is sometimes referred to as SharePoint Online. The technology is very similar to OneDrive for Business, and the sync client is the same, but adds a host of other collaboration features that are not included in OneDrive for Business.
In the rest of this article, I’m going to refer to OneDrive for Business and Sites collectively as SharePoint Online, because they’re both based on the same backend server technology and sync client.
Migrating data to SharePoint Online
The easiest way to move local files and folders, or files stored on the consumer version of OneDrive, to SharePoint Online is to sync a document library using the OneDrive for Business sync client to your PC, and then copy the required files to the sync’d library, and wait for the client to upload the files to SharePoint.
Sounds simple, right? It is, until synchronization fails without any indication of what the problem might be. Usually this is down to the limitations of SharePoint Online supported file types: file names cannot contain some special characters, and file paths must be 250 characters or less. Additionally, 2GB is the maximum file size allowed. For more details on the limitations, see Restrictions and limitations when you sync SharePoint libraries to your computer through OneDrive for Business on Microsoft’s website, where there’s a tool that scans files to check they don’t fall foul of some of the limitations mentioned above, the operative word being some.
While synchronization worked for a couple of weeks, the sync client then suffered a catastrophic failure from which none of the usual remedies helped, such as clearing the local cache and trying to resync the document libraries. After failing to resolve the issue with the sync client, I transferred the local copy of files synced from SharePoint Online back to consumer OneDrive. A few days later, I tried to migrate back to SharePoint Online, and the sync client started working for no apparent reason. Within a couple of days, I was back at square one with the same hardware failure error message.
Alternative solutions: mapped drives and third-party sync clients
Out of interest, I decided to research alternatives to Microsoft’s sync client. Starting with what might seem the easiest solution, I mapped a network drive to SharePoint online; but you can’t take files offline, and performance is painfully slow. Additionally as I later discovered, copying files from the mapped drive to your local PC is a hit and miss affair, often resulting in multiple failures.
Unlike Dropbox, there’s no means of downloading folders or multiple files from SharePoint Online, so if the sync client fails, under certain circumstances you could face the prospect of downloading files individually if you want to maintain an offline copy.
GoodSync
GoodSync is an advanced synchronization client that’s available in free and paid editions. I managed to successfully sync OneDrive for Business, although unlike Microsoft’s own client, there’s no indication in File Explorer that files are either currently being synced or have been successfully synced, leaving the user without any information about the current state of synchronization. After several email exchanges with GoodSync support, I was left unable to sync an Office 365 Site document library.
ZeeDrive and ExpanDrive
ZeeDrive and ExpanDrive both create and manage mapped drives to cloud storage, so they can’t be considered synchronization clients as such. ExpanDrive suffered the same issues as a natively mapped drive to SharePoint Online, in that copying files was an unreliable process. And ZeeDrive failed to connect to SharePoint Online, declaring the URL was incorrect, despite working elsewhere.
Unified sync client
OneDrive for Business presents something of a catch 22 situation. On one hand, it makes sense to make use of the free 1TB of storage available for each user if you have an Office 365 subscription. On the other hand, if offline access to files is a requirement, then the lack of reliable and easy-to-deploy sync client could rule OneDrive for Business out as a solution. GoodSync might prove useful as a backend tool for synchronizing cloud storage for backup purposes, but it’s too complicated to maintain and support on end users’ PCs.
But there’s a glimmer of hope on the horizon, as Microsoft has announced that a unified sync client for consumer OneDrive and OneDrive for Business will be released in Q3 2015. But considering Microsoft’s track record, I remain sceptical whether they can deliver an acceptable solution. Watch this space for more information later in the year.
Assinar:
Postagens (Atom)
-
If you are receiving an error Destination Path Too Long when trying to copy or move a file to a folder, try the quick trick below. The re...
-
O Time Machine faz backup de todos os seus arquivos para um disco rígido externo para que você possa restaurá-los mais tarde ou consultar a...

