sexta-feira, 22 de novembro de 2019

Alternativas Sincronização OneDrive

Habits can be hard to break, but sometimes it’s worth learning to do something differently if it makes life easier. That’s certainly the case when it comes to cloud file storage, because there’s nothing more inefficient than emailing files to colleagues or partners — especially when that involves multiple edits by a team over a period of time.
Microsoft has recently been evangelizing its ‘one source of truth’ paradigm, alongside Office 365 Groups, and the ability to send Modern Attachments directly from OneDrive for Business using Outlook 2016 Preview or the online version of Outlook. For more information on what’s new with Office 365 Groups, see New Features in Office 365 Groups on the Petri IT Knowledgebase.
One source of truth is based around the idea of using cloud storage for hosting master copies of your files and maintaining up-to-date versions in one place, even if other copies of the same files are edited offline or across different devices. This avoids the issue of multiple versions of files being distributed among team members by email or removable storage, where no one is quite sure which version is most current.

OneDrive, OneDrive for Business, or Sites (SharePoint Online)

In OneDrive versus OneDrive for Business on Petri, I ran through some fundamental differences between the two products, including the two separate sync clients. At this point it’’ worth mentioning Office 365 Sites, because although OneDrive for Business is based on SharePoint, it’s intended for use as personal storage, with the ability to share documents when needed. But Microsoft’s solution for sharing documents with a team of people is Sites, which is sometimes referred to as SharePoint Online. The technology is very similar to OneDrive for Business, and the sync client is the same, but adds a host of other collaboration features that are not included in OneDrive for Business.
In the rest of this article, I’m going to refer to OneDrive for Business and Sites collectively as SharePoint Online, because they’re both based on the same backend server technology and sync client.

Migrating data to SharePoint Online

The easiest way to move local files and folders, or files stored on the consumer version of OneDrive, to SharePoint Online is to sync a document library using the OneDrive for Business sync client to your PC, and then copy the required files to the sync’d library, and wait for the client to upload the files to SharePoint.
Sounds simple, right? It is, until synchronization fails without any indication of what the problem might be. Usually this is down to the limitations of SharePoint Online supported file types: file names cannot contain some special characters, and file paths must be 250 characters or less. Additionally, 2GB is the maximum file size allowed. For more details on the limitations, see Restrictions and limitations when you sync SharePoint libraries to your computer through OneDrive for Business on Microsoft’s website, where there’s a tool that scans files to check they don’t fall foul of some of the limitations mentioned above, the operative word being some.
While synchronization worked for a couple of weeks, the sync client then suffered a catastrophic failure from which none of the usual remedies helped, such as clearing the local cache and trying to resync the document libraries. After failing to resolve the issue with the sync client, I transferred the local copy of files synced from SharePoint Online back to consumer OneDrive. A few days later, I tried to migrate back to SharePoint Online, and the sync client started working for no apparent reason. Within a couple of days, I was back at square one with the same hardware failure error message.

Alternative solutions: mapped drives and third-party sync clients

Out of interest, I decided to research alternatives to Microsoft’s sync client. Starting with what might seem the easiest solution, I mapped a network drive to SharePoint online; but you can’t take files offline, and performance is painfully slow. Additionally as I later discovered, copying files from the mapped drive to your local PC is a hit and miss affair, often resulting in multiple failures.
Unlike Dropbox, there’s no means of downloading folders or multiple files from SharePoint Online, so if the sync client fails, under certain circumstances you could face the prospect of downloading files individually if you want to maintain an offline copy.

GoodSync

GoodSync is an advanced synchronization client that’s available in free and paid editions. I managed to successfully sync OneDrive for Business, although unlike Microsoft’s own client, there’s no indication in File Explorer that files are either currently being synced or have been successfully synced, leaving the user without any information about the current state of synchronization. After several email exchanges with GoodSync support, I was left unable to sync an Office 365 Site document library.

ZeeDrive and ExpanDrive

ZeeDrive and ExpanDrive both create and manage mapped drives to cloud storage, so they can’t be considered synchronization clients as such. ExpanDrive suffered the same issues as a natively mapped drive to SharePoint Online, in that copying files was an unreliable process. And ZeeDrive failed to connect to SharePoint Online, declaring the URL was incorrect, despite working elsewhere.

Unified sync client

OneDrive for Business presents something of a catch 22 situation. On one hand, it makes sense to make use of the free 1TB of storage available for each user if you have an Office 365 subscription. On the other hand, if offline access to files is a requirement, then the lack of reliable and easy-to-deploy sync client could rule OneDrive for Business out as a solution. GoodSync might prove useful as a backend tool for synchronizing cloud storage for backup purposes, but it’s too complicated to maintain and support on end users’ PCs.
But there’s a glimmer of hope on the horizon, as Microsoft has announced that a unified sync client for consumer OneDrive and OneDrive for Business will be released in Q3 2015. But considering Microsoft’s track record, I remain sceptical whether they can deliver an acceptable solution. Watch this space for more information later in the year.
segunda-feira, 18 de novembro de 2019

Permitir caracteres invalidos no Sharepoint Online

Connect-SPOService -Url https://fircapitalholding-admin.sharepoint.com
Set-SPOTenant -SpecialCharactersStateInFileFolderNames Allowed

domingo, 17 de novembro de 2019

How can I RDP to an Azure AD joined Windows 10 device ?

Introduction

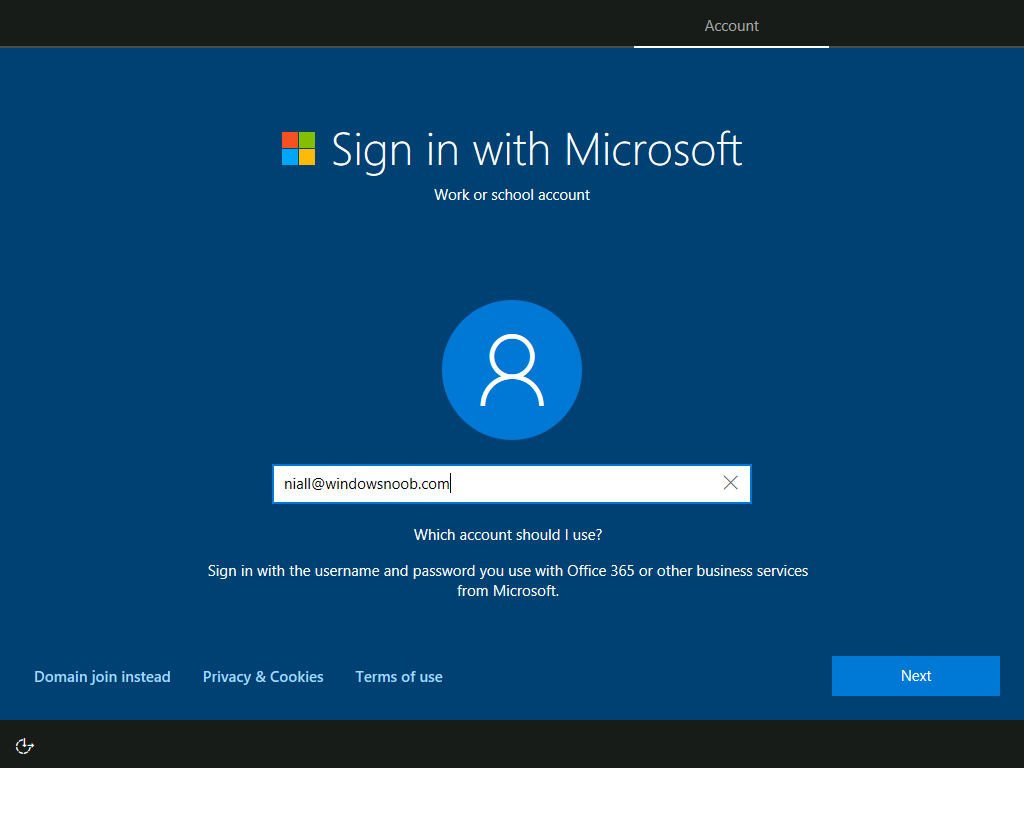
If you are using Azure AD, you can join Azure AD as part of the Windows 10 version 1703  OOBE, it’s easy to do, just provide your AzureAD credentials…
and once it has completed OOBE your computer will be AzureAD joined.
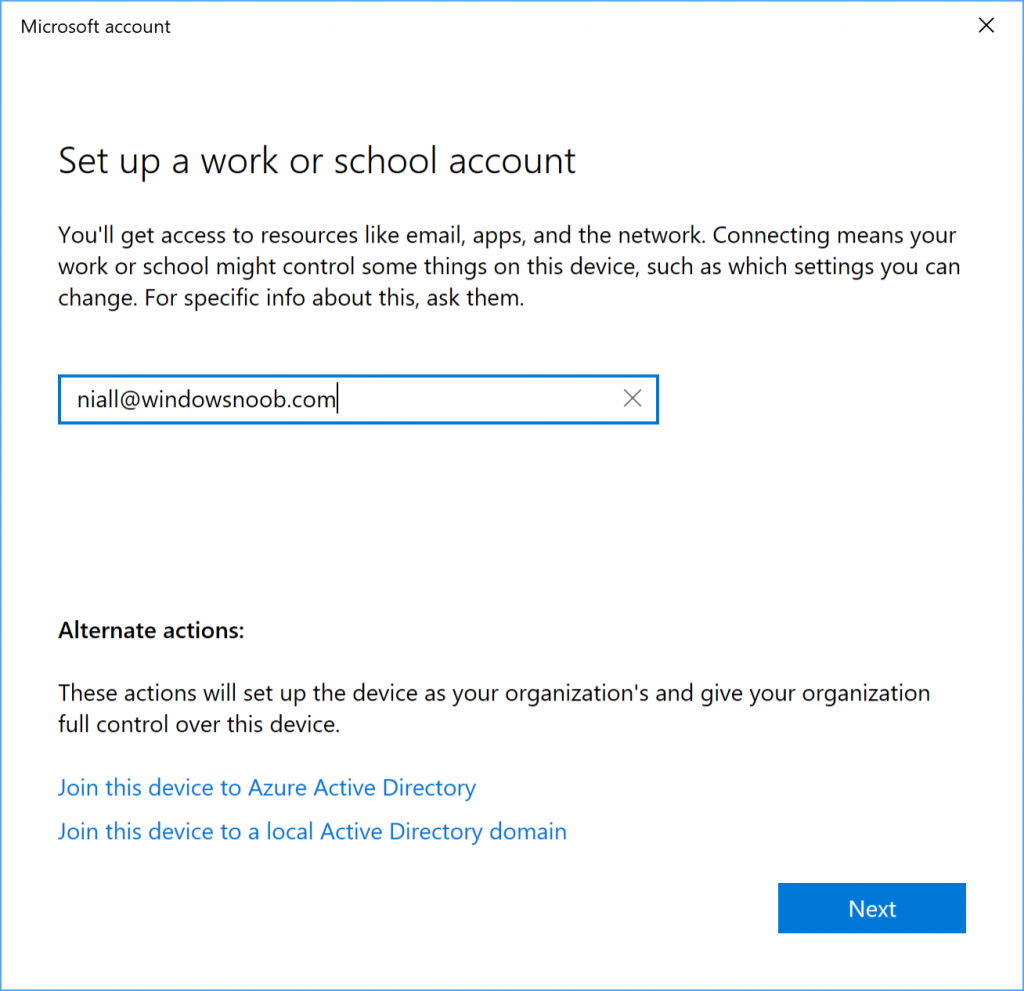
Alternatively you can join AzureAD using All Settings, Accounts, Access work or school, click on Connect and enter your AzureAD username, then click on Join this device to Azure Active Directory and continue through the wizard.
Note: if this option is missing verify you are on Windows 10 v1703 and that your DNS is working correctly.
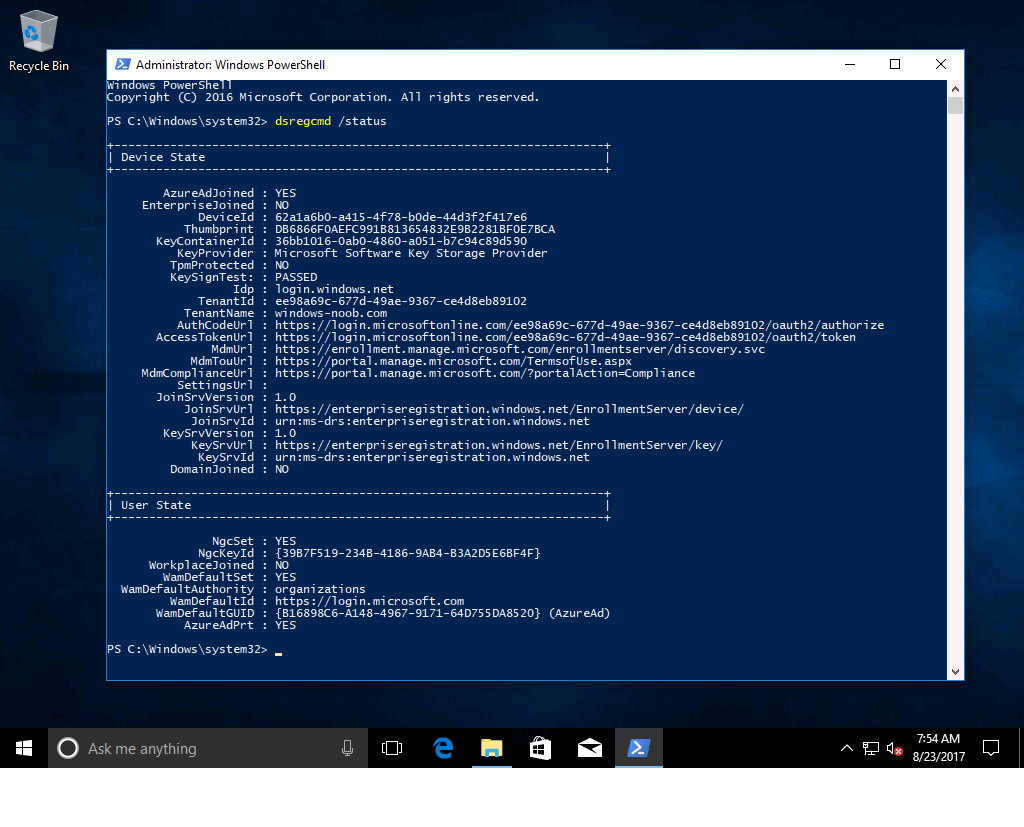
You can verify that your device has successfully joined AzureAD via a PowerShell command:
dsregcmd /status
and the output is shown below, notice it’s AzureAdJoined=YES.
If you want to RDP to this computer, you’ll need a few things in place on the computer you are RDP’ing from and the computer you are RDP to.
Note: This post is aimed at a lab environment, I’ll update it shortly to include production (from a security perspective).

Step 1. Change Remote desktop settings

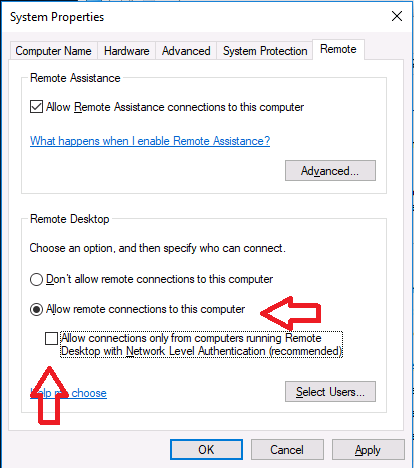
On the computer you intend to RDP to, set the Remote Desktop settings to Allow Remote Connections to this computer and remove the checkbox from Allow connections only from computers running Remote Desktop with Network Level Authentication enabled as shown here.

Step 2. Create new rdp config file

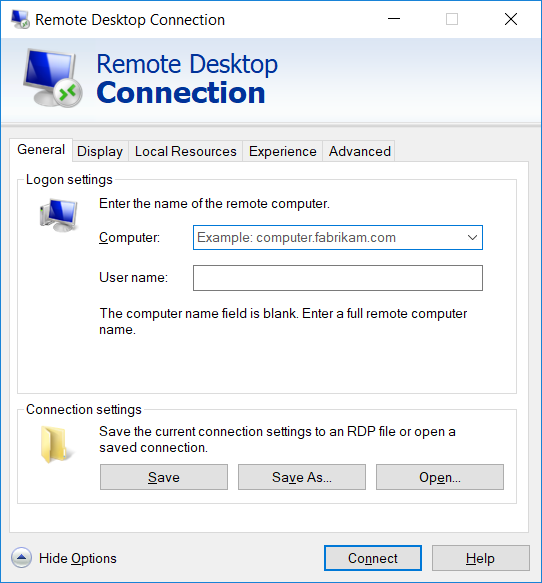
On the computer you intend to RDP from, open mstsc.exe and click on Show Options.
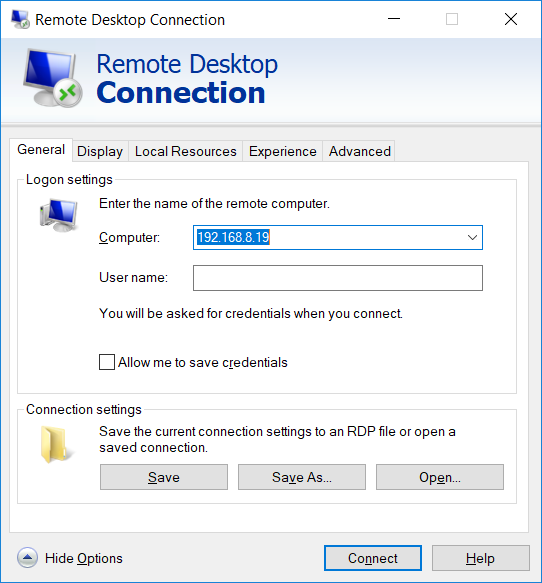
Click on Save As… and give it a new name such as AzureAD_RDP, save it somewhere easy to find.
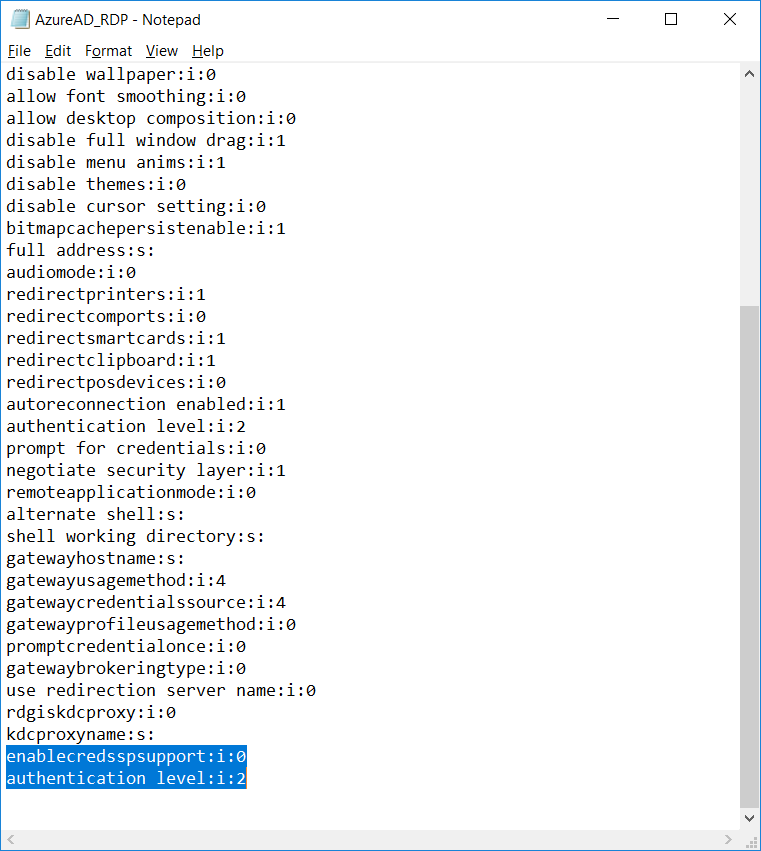
Open the saved file using Notepad. Verify that the following two lines are present, if not, add them.
enablecredsspsupport:i:0
authentication level:i:2
Save the file.

Step 3. RDP to the target computer

On the computer that you just edited the config file, open MSTSC.exe and click on show options, then click on Open. Point it to the previously created AzureAD_RDP config file. Enter the IP address or FQDN of the computer you want to RDP to, do not enter any username.
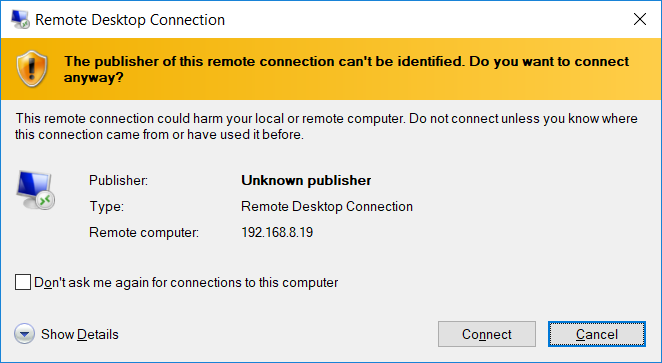
you may see the usual RDP prompt…it’s ok, click on Connect
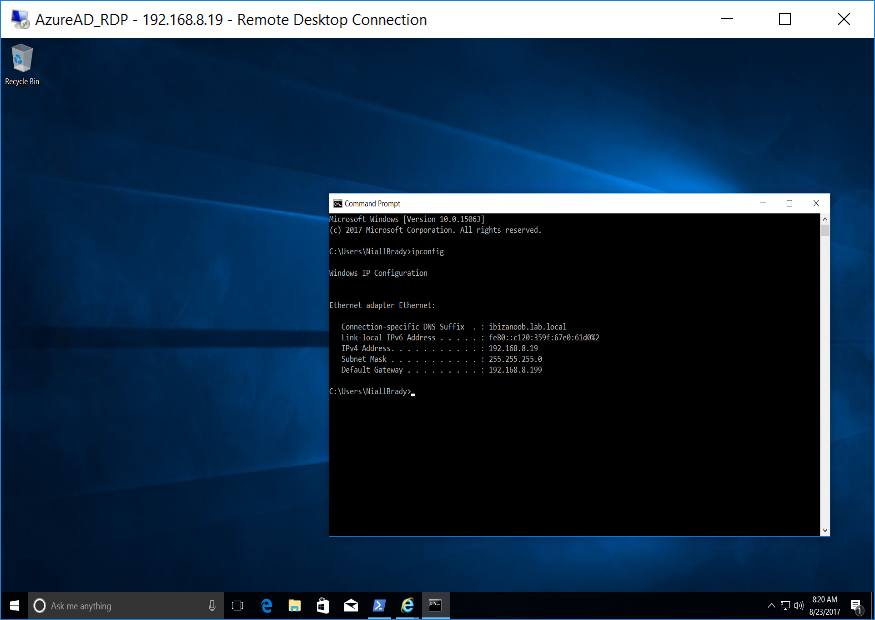
and depending on what device you are connecting from (and to) you’ll see different results, for example from an AzureAD joined device that you’ve logged into with the same UPN as you are using to connect to the target PC you’ll be prompted to enter your AzureAD password like so:-
and you are in
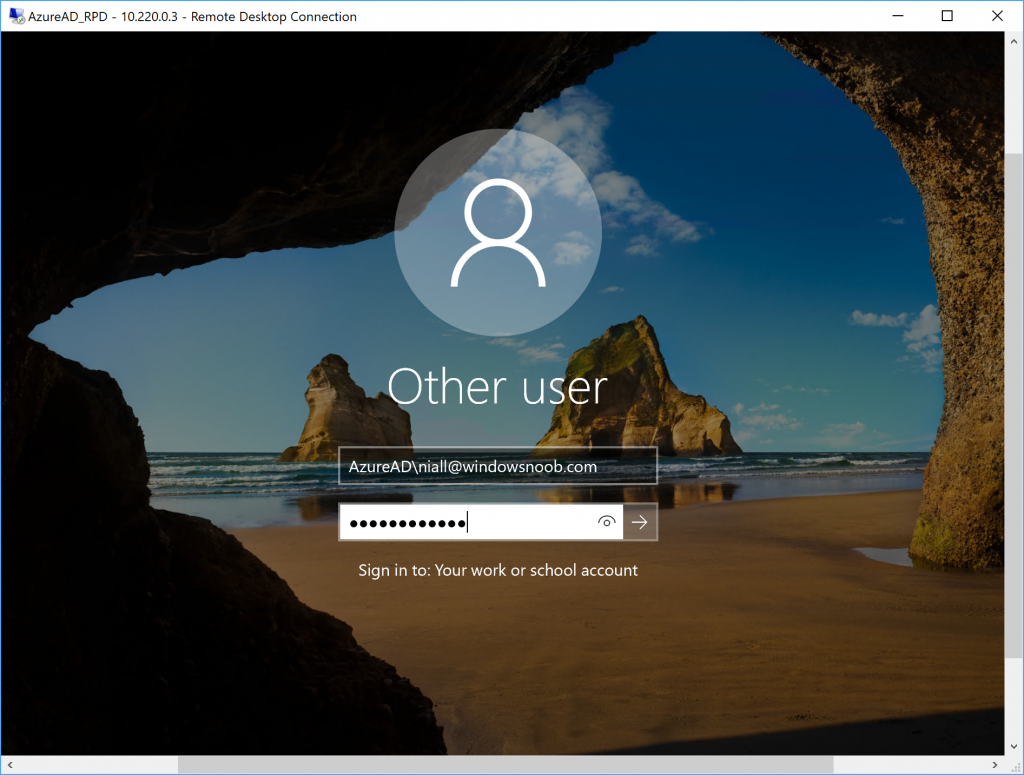
If however you are connecting from say, a Workgroup joined (non azure AD joined) device then the login experience will be different, and you’ll see a login page like this, enter your username as:
AzureAD\<username@domain.com>
where <username@domain.com> is your the full User Principal Name of your AzureAD user
job done 🙂

quinta-feira, 14 de novembro de 2019

Enable Internet Explorer mode on the new Microsoft Edge

Enable Internet Explorer mode on the new Microsoft Edge

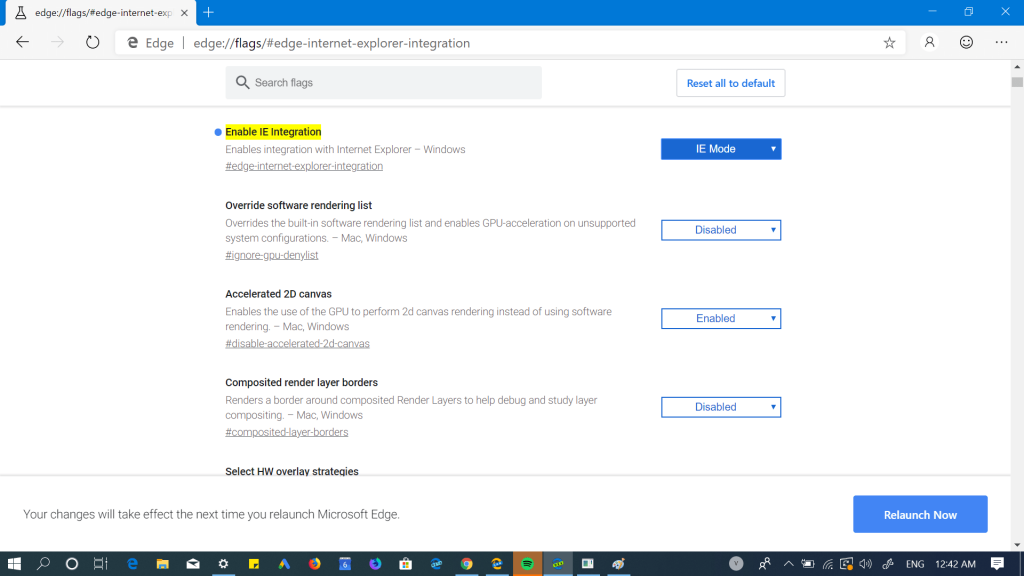
1. Launch Microsoft Edge browser.
2. Next, you copy-paste the following address:
edge://flags/#edge-internet-explorer-integration
3. Using the drop-down change the settings from Default to IE Mode and then click on the Relaunch now button to apply the changes.
enable internet explorer integration in edge browser
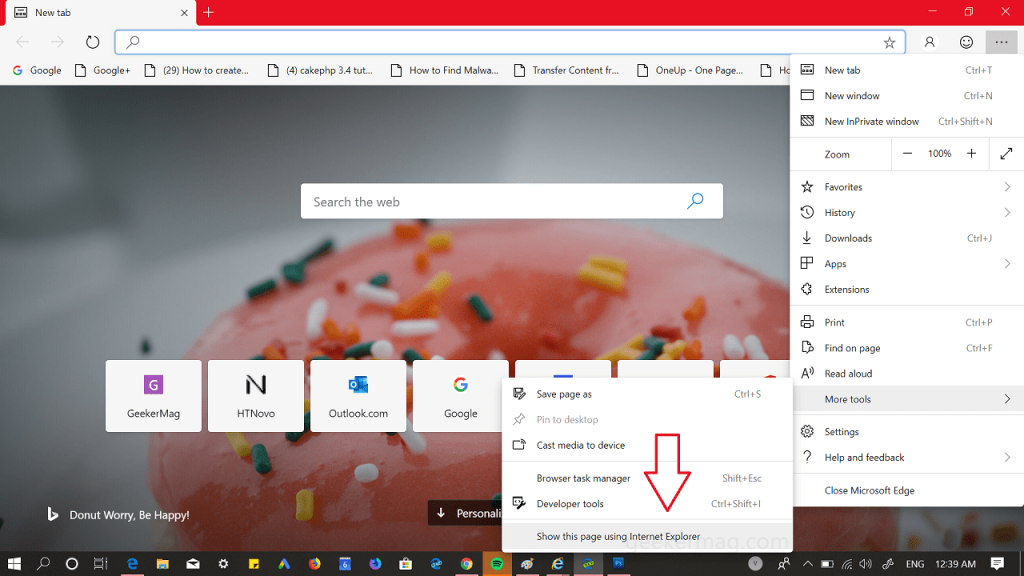
4. To see new Internet Explorer settings, you need to click on the (…) More action icon available on the upper right corner, select More Tools > Show this page with Internet Explorer.
how to enable Internet Explorer mode in Edge browser
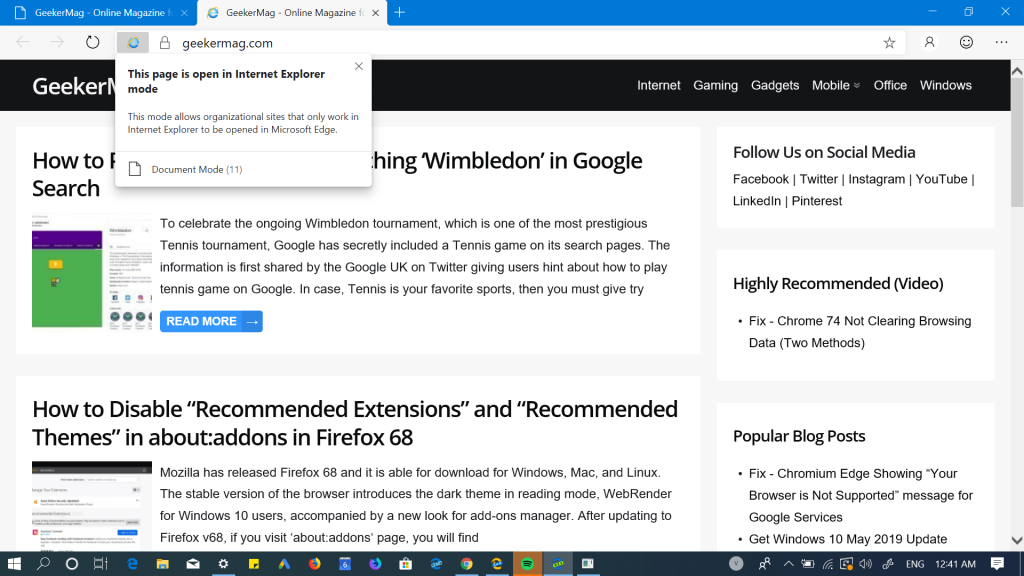
When you open a webpage using Internet Explorer mode, a new tab will open in the Edge browser. Whenever you launch web page using the IE Mode, an Internet Explorer icon will appear in the address bar.
Note – In case, you’re if you try to use this mode and a quick dialog box giving an error message which reads “Can’t open this page with Internet Explorer mode“, then it seems like your device is not compatible to use this feature or you have to wait for next updates.
What are your thoughts about Internet Explorer mode for Microsoft Edge browser? We would like to hear from you in the comments.

quarta-feira, 13 de novembro de 2019

Como tornar o Windows 10 aceitar caminhos de arquivo acima de 260 caracteres

Com a atualização de aniversário do Windows 10, você pode finalmente abandonar o limite máximo de 260 caracteres no Windows. Você só precisa fazer uma pequena edição no Registro do Windows ou na Diretiva de Grupo. Veja como fazer isso acontecer.
Antes do Windows 95, o Windows permitia apenas nomes de arquivo com oito caracteres de comprimento, com uma extensão de arquivo de três caracteres - normalmente conhecida como nome de arquivo 8.3. O Windows 95 abandonou isso para permitir nomes longos de arquivos, mas ainda limitou o comprimento máximo do caminho (que inclui o caminho completo da pasta e o nome do arquivo) para 260 caracteres. Esse limite está em vigor desde então. Se você já se deparou com esse limite, provavelmente foi quando você estava tentando copiar estruturas de pastas profundas em outras pastas, como ao copiar o conteúdo de um disco rígido para uma pasta em outra unidade. A Atualização de Aniversário do Windows 10 finalmente adiciona a opção de abandonar esse comprimento máximo de caminho.
Há uma ressalva. Essa nova configuração não funcionará necessariamente com todos os aplicativos existentes, mas funcionará com a maioria. Especificamente, quaisquer aplicativos modernos devem ser bons, assim como todos os aplicativos de 64 bits. Aplicativos antigos de 32 bits precisam ser manifestados para funcionar, o que na verdade significa que o desenvolvedor indicou no arquivo de manifesto do aplicativo que o aplicativo suporta caminhos mais longos. Os aplicativos de 32 bits mais populares não devem ter problemas. Ainda assim, você não arrisca nada tentando a saída. Se um aplicativo não funcionar, a única coisa que acontecerá é que ele não poderá abrir ou salvar arquivos salvos em locais onde o caminho completo exceder 260 caracteres.

Usuários residenciais: remova o caractere 260 Limite de caminho editando o registro

Se você tiver uma edição Home do Windows, precisará editar o Registro do Windows para fazer essas alterações. Você também pode fazer isso se tiver o Windows Pro ou Enterprise, mas se sentir mais confortável trabalhando no Registro do que no Editor de Diretiva de Grupo. (Se você tiver Pro ou Enterprise, recomendamos usar o Editor de Diretiva de Grupo mais fácil, conforme descrito na próxima seção.) Aviso padrão: O Editor do Registro é uma ferramenta poderosa, que pode torná-lo instável ou mesmo inoperável. . Este é um hack simples e desde que você siga as instruções, você não deve ter nenhum problema. Dito isso, se você nunca trabalhou com isso antes, considere ler sobre como usar o Editor do Registro antes de começar. E definitivamente faça o backup do Registro (e do seu computador!) Antes de fazer alterações.
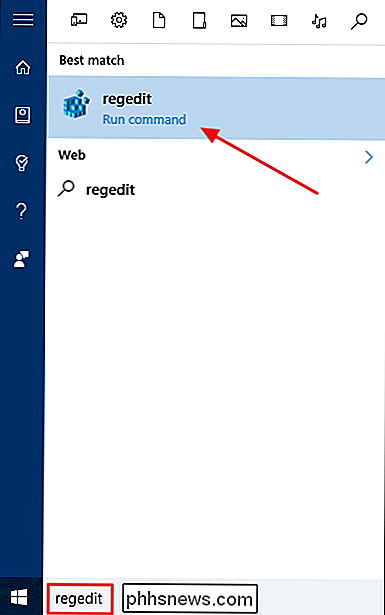
Para começar, abra o Editor do Registro pressionando Iniciar e digite “regedit”. Pressione Enter para abrir o Editor do Registro e dê permissão para fazer alterações your PC.
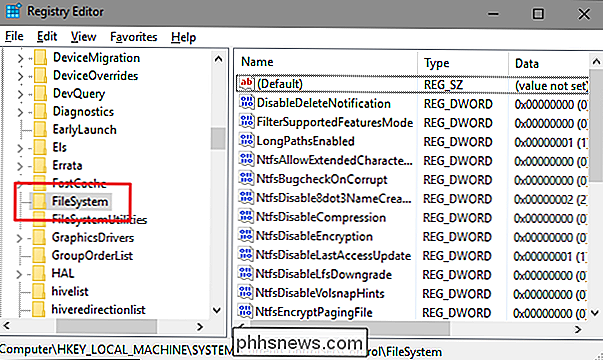
No Editor do Registro, use a barra lateral esquerda para navegar até a seguinte chave:
HKEY_LOCAL_MACHINE SYSTEM CurrentControlSet Control FileSystem
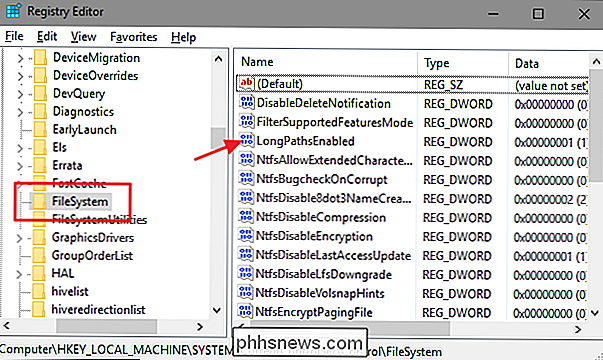
À direita, localize um valor chamado
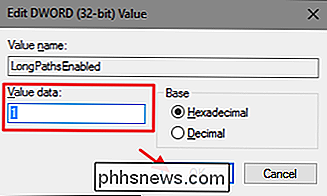
LongPathsEnablede clique duas vezes nele. Se você não vir o valor listado, precisará criá-lo clicando com o botão direito do mouse na chaveFileSystem, escolhendo Novo> Valor DWORD (32 bits) e, em seguida, nomeando o novo valorLongPathsEnabled.Na janela de propriedades do valor, altere o valor de 0 para 1 na caixa "Dados do valor" e clique em OK.
Você pode fechar o Editor do Registro e reiniciar o computador (ou assinar fora de sua conta e conecte novamente). Se você quiser reverter as alterações, volte para o valor
LongPathsEnablede defina-o de 1 de volta para 0.Baixe nosso registro de registro com um clique

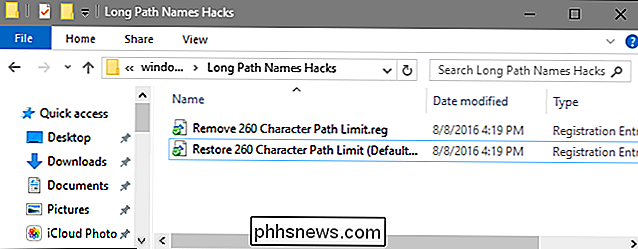
Se você não se sentir como mergulhar no Registro, criamos dois hacks de registro para download que você pode usar. Um hack remove o limite de 260 caracteres e o outro hack restaura o limite padrão. Ambos estão incluídos no seguinte arquivo ZIP. Clique duas vezes no que você deseja usar, clique nos prompts e reinicie o computador

Hacks de Nomes de Caminho Longo
RELACIONADOS:
Como Tornar Seu Próprio Registro do Windows Hacks Esses hacks são na verdade apenas a
chave FileSystem, reduzidos ao valorLongPathsEnabledque descrevemos acima e exportados para um arquivo .REG. Executar o limite “Remover Limite de Caminho de 260 Caracteres” define o valorLongPathsEnabledcomo 1. Executar o “Restaurar Limite de Caminho de Caracteres 260 (Padrão)” hack define o valor novamente como 0. E se você gosta de brincar com o Registro, vale a pena dedicar um tempo para aprender como criar seus próprios hacks de Registro.Usuários Pro e Enterprise: remova o Limite de Caminho de Caracteres 260 com o Editor de Diretiva de Grupo Local

RELACIONADO:

Usando o Editor de Diretiva de Grupo para Tweak Your PC Se você estiver usando o Windows 10 Pro ou Enterprise, a maneira mais fácil de desativar as novas notificações de instalação do aplicativo é usando o Editor de Diretiva de Grupo Local. É uma ferramenta muito poderosa, por isso, se você nunca usou antes, vale a pena dedicar algum tempo para aprender o que ela pode fazer. Além disso, se você estiver em uma rede corporativa, faça um favor a todos e verifique com seu administrador primeiro. Se o seu computador de trabalho fizer parte de um domínio, também é provável que faça parte de uma diretiva de grupo de domínio que substituirá a diretiva de grupo local.
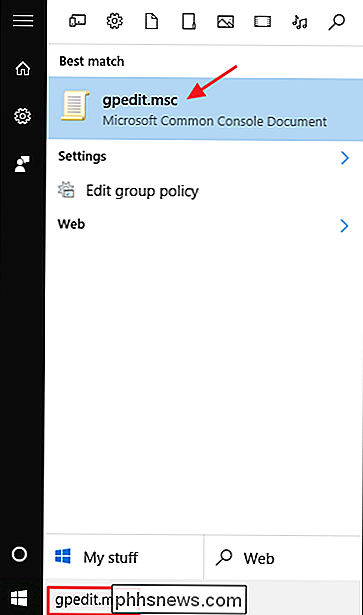
No Windows 10 Pro ou Enterprise, pressione Iniciar, digite gpedit.msc e pressione Enter.
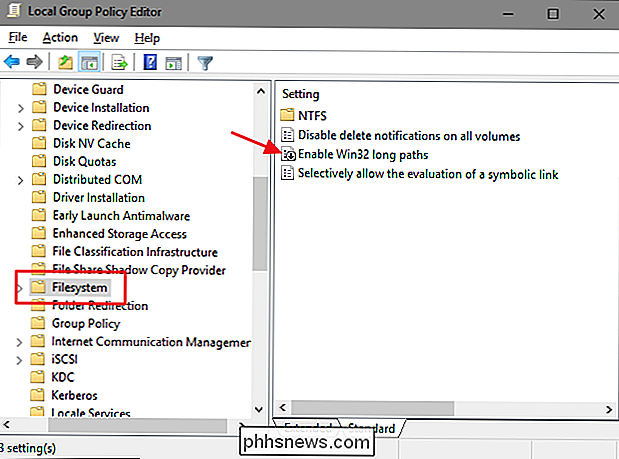
No Editor de Diretiva de Grupo Local, no painel esquerdo, vá até Configuração do Computador> Modelos Administrativos> Sistema> Sistema de Arquivos. À direita, localize o item "Ativar caminhos longos do win32" e clique duas vezes nele.
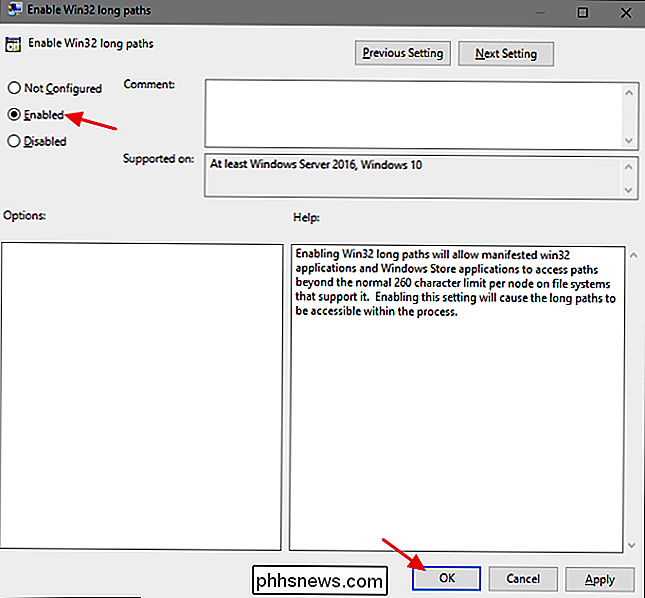
Na janela de propriedades que é aberta, selecione a opção "Ativado" e clique em "OK".
Agora você pode sair do Editor de Diretiva de Grupo Local e reinicie o computador (ou saia e volte) para permitir que as alterações sejam concluídas. Se, a qualquer momento, você quiser reverter as alterações, basta seguir o mesmo procedimento e definir essa opção novamente como "Desativado" ou "Não configurado".
O limite máximo de caminho pode não ser algo que você já encontrou para algumas pessoas, certamente pode ser uma frustração ocasional. O Windows 10 finalmente adicionou a capacidade de remover esse limite. Você só precisa fazer uma rápida alteração no Registro ou na Política de Grupo para que isso aconteça.

segunda-feira, 11 de novembro de 2019

Error When Sending Mail: imceaex-_o=first+20organization_ou=first+20administrative


This problem can be caused by importing Outlook autocomplete (the NK2 file) from one domain to another or when migrating domains. The outlook autocomplete address does not match the active directory address. The error message is accompanied by a bounce back message indicating that you cannot send E-mail to a particular person within your organization.
To correct this problem, follow these steps:
Open Outlook click New E-Mail. Begin typing the name of the person until the autocomplete displays their full name and e-mail address. Click on the x to the right of the person’s name to delete the e-mail address from the cache.
image 
If you do not see the X, press the delete key on your keyboard to remove the autocomplete entry. Send the person a new E-Mail by typing in their full E-Mail address and the new remembered address will be the correct one.

Como mover senhas e favoritos entre Microsoft Edge Chromium

  Press  Win + R  keys to open up the  Run  dialog box. Type  %LocalAppData%\Microsoft\Edge\User Data  and press  enter . Move the  Default ...